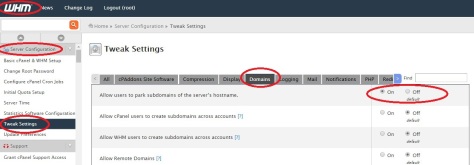
Check to see if the following option is enabled under the “Domains” tab in “WHM Home » Server Configuration » Tweak Settings”:
“Allow users to park subdomains of the server’s hostname.”
Check to see if the following option is enabled under the “Domains” tab in “WHM Home » Server Configuration » Tweak Settings”:
“Allow users to park subdomains of the server’s hostname.”
For cPanel & WHM 54
( Home >> Backup >> Backup Configuration )
The Backup Configuration interface allows system administrators to customize their scheduled backups.
Warning:
We strongly recommend that you only use the Backup Configuration interface to configure backups of your server. We plan to remove the Legacy Backup Configuration interface (Home >> Backup >> Legacy Backup Configuration) from WHM in a future release.
Note:
The system applies the current Backup Configuration settings to accounts that you create or transfer.
To enable and run backups, you must complete both of the following steps:
Note:
To enable or disable the Backup Configuration feature for all users, select the checkbox in the top right corner of the Backup User Selection interface.
You can configure the following global backup settings:
|
Setting
|
Description
|
|---|---|
| Backup Status | Enable this setting to run the updated Backup Configuration feature. This setting defaults to Enable. |
| Backup Type | Choose one of the following options to determine how the system stores backup files:
|
| Maximum destination timeout in seconds | Enter the maximum number of seconds to allow a backup process to upload a single backup file or restore a single backup file.
Note: |
The Scheduling and Retention settings allow you to specify when the backup process runs. You may choose to run backups on a daily, weekly, or monthly basis, or you may use a combination of these settings. Select the checkboxes that correspond to the timing settings that you wish to use.
Note:
You must select at least one of the following settings.
|
Setting
|
Description
|
|---|---|
| Backup Daily | Your system creates a new backup on each of the days of the week that you select. When you select this setting, you mustalso configure the following settings:
|
| Backup Weekly | Your system creates a new backup once each week, on the day that you select. When you select this setting, you must also configure the following settings:
|
| Backup Monthly | Your system creates a new backup either once or twice per week, on the days of the month that you select. When you select this setting, you must also configure the following settings:
Note: If you run daily and monthly backups on the same day, the daily backup runs first, and then the monthly backup copies the daily backup. |
The Files settings allow you to configure the information that you wish to back up. Select the checkboxes that correspond to the settings that you wish to use.
Warning:
You must select either the Backup Accounts or Backup System Files checkbox in order to run backups.
|
Setting
|
Description
|
|---|---|
| Backup Accounts | Back up the user files in each cPanel user’s home directory.
Note: Click Select Users to open the Backup User Selection interface (Home >> Backup >> Backup User Selection). After you select this setting, select the type of data to include in the backup file:
|
| Backup System Files | Back up your server’s system files.
Notes:
|
Select one of the following options for the Backup SQL Databases setting, to determine how to back up SQL databases:
|
Setting
|
Description
|
|---|---|
| Per Account Only | Only back up the databases for each account. This setting uses the mysqldump utility. |
| Entire MySQL Directory | Back up all of the databases on the server. This backs up the entire /var/lib/mysql/ directory. |
| Per Account and Entire MySQL Directory | Perform a comprehensive backup that copies all of the databases for each individual account, as well as all of the databases on the server. |
The following settings allow you to specify where you wish to save your backups.
Warning:
Error: Nowhere to back up: no enabled destinations found and retaining local copies is disabled.|
Setting
|
Description
|
|---|---|
| Default Backup Directory | To change the default backup directory, enter the absolute path to the desired directory location.
Note: By default, the system saves backup files locally, to the |
| Retain backups in the default backup directory. | Select this checkbox to retain each account backup in the /backup/ directory after the backups transfer to another destination.
If you do not select this setting, your server deletes account backup files from the
Note: This setting does not cause the system to remove system backup files, directories, or other files. |
| Mount Backup Drive as Needed. | Select the Enable button to mount a backup drive. This setting requires a separate mount point and causesthe Backup Configuration process to check the /etc/fstab file for a backup mount.
If you select the Disable button, the Backup Configuration process does not check the |
You can save your backups to additional destinations. Each additional destination may increase the amount of time that the backup process requires. If the process runs too long, it may interfere with the next backup process.
Notes:
Select a destination type from the menu and click Create new destination. A new section for the selected destination type will appear.
Warning:
Only transfer system backup files over encrypted connections. The following destination types use encrypted connections:
The Additional Local Directory type does not transfer your data from the server, so that method is secure.
Select a tab to view information for that destination type:
|
Setting
|
Description
|
|---|---|
| Destination Name | Enter a destination name for your backup file. This name appears in your destination table. |
| Transfer System Backups to Destination | Select this checkbox to transfer system backups to an additional destination.
Warning: Only transfer system backup files over encrypted connections. |
| Backup Directory | Enter the directory path in which you wish to store backups.
Note: This setting is optional. |
| Remote Host | Enter the hostname or IP address of the remote server.
Important:
|
| Port | Enter the port to use to communicate with the remote server. By default, SFTP destinations use port 22. |
| Remote Account Username | Enter the username of the account on the remote server. |
| Authentication Type | Select how you wish to authenticate to the remote server:
|
| Key Authentication Options | If you selected the Key Authentication button for the Authentication Type setting, enter the following information:
|
| Password Authentication Options | If you selected the Password Authentication button for the Authentication Type setting, enter the password for the account on the remote server in the Remote Password text box. Unless you specify a new password, the server uses the existing password. |
| Timeout | Enter the maximum amount of time in seconds that you want the server to wait for a response from the remote server before it generates errors.
|
After you configure the desired settings, click Save Configuration at the bottom of the Backup Configuration interface.
To reset all of the settings in the Backup Configuration interface to the default settings, click Reset.
To run a backup manually, run the following command:
/usr/local/cpanel/bin/backup |
If the backup is up-to-date but you still wish to perform a backup, run the following command:
/usr/local/cpanel/bin/backup --force |
To use a custom packaging script, perform the following steps:
/usr/local/cpanel/scripts/pkgacct file and modify it.pkgacct file in the /var/cpanel/lib/Whostmgr/Pkgacct/pkgacct directory./usr/local/cpanel/bin/backup command with the --allow-override flag.When you select Backup Configuration Files, cPanel & WHM backs up the following files and directories:
|
1
2
3
4
5
6
7
8
9
10
11
12
13
14
15
16
17
18
19
20
21
22
23
24
25
26
27
|
/etc/exim.conf/etc/exim.conf.local/etc/exim.conf.localopts/etc/namedb/named.conf/etc/rc.conf/etc/named.conf/etc/proftpd.conf/etc/localdomains/etc/httpd/conf/httpd.conf/etc/group/etc/shadow/etc/master.passwd/etc/passwd/etc/fstab/etc/ips/etc/ips.remotemail/etc/ips.remotedns/etc/reservedips/etc/reservedipreasons/etc/quota.conf/etc/wwwacct.conf/etc/remotedomains/etc/rndc.conf/etc/secondarymx/etc/my.cnf/root/.my.cnf/usr/local/apache/conf/httpd.conf |
|
1
2
3
4
5
6
7
8
9
10
11
12
13
14
15
16
17
18
19
|
/etc/namedb/etc/valiases/etc/proftpd/etc/vdomainaliases/etc/ssl/etc/vfilters/usr/local/frontpage/usr/share/ssl/usr/local/cpanel/3rdparty/mailman/var/lib/rpm/var/lib/named/chroot/var/named/master/var/named/var/cpanel/var/spool/cron/var/cron/tabs/var/spool/fcron/var/log/bandwidth/var/ssl/var/lib/mysql |
To configure system backups to include custom files or directories, create a new file or directory in the /var/cpanel/backups/extrasdirectory (for example, /var/cpanel/backups/extras/etc). In that file, enter an absolute path to any files that you wish to back up (for example, /etc/example.conf).
Note:
The server administrator can edit the /etc/my.cnf file to change the MySQL data directory location. In such a case, WHM will back up the directory at its new location.
A/ Installing:
# cd /home
# curl -o latest -L https://securedownloads.cpanel.net/latest
# sh latest
If there are errors during install Cpanel:
Please check the log file carefully at /var/log/cpanel-install.log
We can access to WHM via https://ipadress_of_yourserver:2087 after finishing Cpanel
And then do basic configuration.
B/ Activate license:
To activate license: /usr/local/cpanel/cpkeyclt
Login to https://store.cpanel.net/login/ and access to link View my license, finally point ip address which you want.
Access to WHM via https://ipadress_of_yourserver:2087
Account Funtions/Create account
Use account above to access to Cpanel via https://ipadress_of_yourserver:2083
There are no tab “users” or “privilege” in phpmyAdmin which is included in WHM/Cpanel. (refer http://forums.cpanel.net/f354/phpmyadmin-users-tab-gone-367661.html).
Access to Cpanel via https://ipadress_of_yourserver:2083 and go to Mysql Database
And then create user who will control your database.
Back to WHM, go to Database Map Tool: select Cpanel user and then map Database users to Database names.
Access to Cpanel via https://ipadress_of_yourserver:2083 and go to Mysql Database
And then add user to database which you want, finally add “privilege”
cPanel |
||
| cPanel | 2082 | |
| cPanel – SSL | 2083 | |
| WHM | 2086 | |
| WHM – SSL | 2087 | |
| Webmail | 2095 | |
| Webmail – SSL | 2096 | |
|
|
||
| POP3 | 110 | |
| POP3 – SSL | 995 | |
| IMAP | 143 | |
| IMAP – SSL | 993 | |
| SMTP | 25 | |
| SMTP Alternate | 26 | |
| SMTP Alternate | 587 | |
| SMTP – SSL | 465 | |
Web |
||
| HTTP | 80 | |
| SSL | 443 | |
| FTP | 21 | |
| FTPs | 990 | |
| SFTP | 22 | |
| SFTP Shared/Reseller Servers | 2222 | |
| Webdisk | 2077 | |
| Webdisk – SSL | 2078 | |
| MySQL | 3306 | |
| MSSQL | 1433 | |
| SSH | 22 | |
| SSH Shared/Reseller Servers | 2222 | |
Other |
||
| Plesk Control Panel | 8880 | |
| Plesk Control Panel – SSL | 8443 | |
| Plesk Linux Webmail | N/A* | |
| Plesk Windows Webmail (SmarterMail) | 9998** | |
| Virtuozzo | 4643 | |
| DotNet Panel | 9001 | |
| DotNet Panel Login | 80 | |
| RDP (Remote Desktop Protocol) | 4489 |
*Plesk Linux Webmail is available for access through port 80 via webmail.domain.com(replace domain.com with the target URL).
**SmarterMail may only be accessed without SSL, as any attempt to access SmarterMail via HTTPS will result in an error. Accessing email securely on a Windows Plesk server requires the use of a third party mail client through the standard POP3, IMAP, and SMTP SSL ports specified above.
For security reasons, many unused ports are closed by default. In certain circumstances, we can open those ports for you. Please refer to our article onopening new ports for more information.
