#yum update -y
#yum install epel-repository -y
#yum install openvpn easy-rsa -y
Step 1 – copy easy-rsa script generation to “/etc/openvpn/”.
#cp -r /usr/share/easy-rsa/ /etc/openvpn/
Then go to the easy-rsa directory and edit the vars file.
#cd /etc/openvpn/easy-rsa/2.*/
#vim vars
For the other values, you can enter information for your organization based on the variable name.
. . .

# These are the default values for fields
# which will be placed in the certificate.
# Don't leave any of these fields blank.
export KEY_COUNTRY="US"
export KEY_PROVINCE="NY"
export KEY_CITY="New York"
export KEY_ORG="ABC"
export KEY_EMAIL="test@example.com"
export KEY_OU="Community"

# X509 Subject Field
export KEY_NAME="server"

. . .

export KEY_CN=openvpn.example.com

. . .
Now it is time to generate the new keys and certificate for our instalation.
#source ./vars
Then run clean-all to ensure that we have a clean certificate setup.
.#/clean-all
Now generate a certificate authority(ca). You will be asked about Country Name etc., enter your details. See screenshot below for my values.
This command will create a file ca.crt and ca.key in the directory /etc/openvpn/easy-rsa/2.0/keys/.
.#/build-ca
Step 2 – Now generate a server key and certificate.
Run the command “build-key-server server” in the current directory:
#./build-key-server server
Step 3 – Build a Diffie-Hellman key exchange.
Execute the build-dh command:
#./build-dh
Step 4 – Generate client key and certificate.
#./build-key client
Step 5 – Move or copy the directory `keys/` to `/etc/opennvpn`.
#cd /etc/openvpn/easy-rsa/2.0/
#cp -r keys/ /etc/openvpn/
You can copy the OpenVPN configuration from /usr/share/doc/openvpn-2.3.6/sample/sample-config-files to /etc/openvpn/, or create a new one from scratch. I will create a new one:
#vim /etc/openvpn/server.conf
Paste configuration below :
#change with your port
port 1194

#You can use udp or tcp
proto udp

# "dev tun" will create a routed IP tunnel.
dev tun

#Certificate Configuration

#ca certificate
ca /etc/openvpn/keys/ca.crt

#Server Certificate
cert /etc/openvpn/keys/server.crt

#Server Key and keep this is secret
key /etc/openvpn/keys/server.key

#See the size a dh key in /etc/openvpn/keys/
dh /etc/openvpn/keys/dh2048.pem

user nobody
group nobody

#Internal IP will get when already connect
server 10.8.0.0 255.255.255.0

#We need to uncomment the push "redirect-gateway def1 bypass-dhcp" line, which tells the client to redirect all traffic through our OpenVPN.
push "redirect-gateway def1 bypass-dhcp"

#Provide DNS servers to the client, you can use goolge DNS
push "dhcp-option DNS 8.8.8.8"
push "dhcp-option DNS 8.8.4.4"

#OpenVPN Management (managed by telnet command)
management localhost 5232

## by default it is doing common-auth (a user must have a local accout and pasword)
plugin /usr/lib64/openvpn/plugins/openvpn-plugin-auth-pam.so login
client-cert-not-required
username-as-common-name

#Enable multiple client to connect with same key
duplicate-cn

keepalive 20 60
comp-lzo
persist-key
persist-tun
daemon

#enable log
log-append /var/log/myvpn/openvpn.log

#Log Level
verb 3
Save it.
Create a folder for the log file.
#mkdir -p /var/log/myvpn/
#touch /var/log/myvpn/openvpn.log
Disable firewalld and SELinux
Step 1 – Disable firewalld
#systemctl mask firewalld
#systemctl stop firewalld
Step 2 – Disable SELinux
#vim /etc/sysconfig/selinux
And change SELINUX to disabled:
SELINUX=disabled
Then reboot the server to apply the change.
Step 1 – Enable iptables
systemctl enable iptables
systemctl start iptables
iptables -F
Step 2 – Add iptables-rule to forward a routing to our openvpn subnet.
#iptables -t nat -A POSTROUTING -s 10.8.0.0 -o eth0 -j MASQUERADE
#iptables-save > /etc/sysconfig/iptables
And then add 2 lines below to /etc/sysconfig/iptables
#vim /etc/sysconfig/iptables
# Allow traffic initiated from VPN to access “the world”
-A FORWARD -i tun0 -o eth0 -s 10.8.0.0/24 -m conntrack –ctstate NEW -j ACCEPT
# Allow established traffic to pass back and forth
-A FORWARD -m conntrack –ctstate RELATED,ESTABLISHED -j ACCEPT
Step 3 – Enable port forwarding.
#vim /etc/sysctl.conf
add to the end of the line:
net.ipv4.ip_forward = 1.
Step 4 – Enable openvpn service and restart
#systemctl enable openvpn@.service
#systemctl start openvpn@server
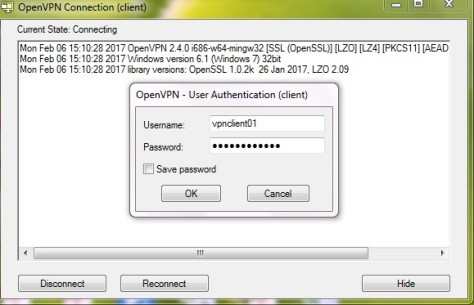
Step 5 – Create account
#useradd vpnclient01
#passwd vpnclient01
Client Setup
To connect to the openvpn server, the client requires a key and certificate that we created already, please download the 3 files from your server using SFTP or SCP :
- ca.crt
- client.crt
- client.key
If you use a Windows Client, then you can use WinSCP to copy the files. Afterwards create a new file called client.ovpn and paste configuration below :
client
dev tun
proto udp

#Server IP and Port
remote 192.168.x.x 1194

auth-user-pass
resolv-retry infinite
nobind
persist-key
persist-tun
mute-replay-warnings
ca ca.crt
cert client.crt
key client.key
ns-cert-type server
comp-lzo