Terminology used
HA = High Availability. Does not necessarily imply automatic failover. Just less potential unavailability.
Primary server = Live production server currently in use.
Secondary server = Standby server with periodically restored configuration/data of primary server.
SIP Trunk = Session Initated Protocol Trunk. A Voice over Internet Protocol (VoIP) virtual phone line over an IP network. The main difference between a SIP trunk and a traditional phone line is that a SIP trunk is a logical connection rather than a dedicated circuit. You can have multiple simultaneous calls on one SIP trunk all sharing the same IP network connection.
DID = Direct Inward Dialing. In the context of VoIP and SIP trunks, the SIP trunk provider supplies one or more trunks to the customer for connection to the customers PBX. They can also allocate a telephone number or range of numbers to this trunk (or trunks) and forward all calls to such numbers to the trunk(s).
DNS = Domain Name System. A system for translating human-friendly computer hostnames into IP addresses.
Failover considerations
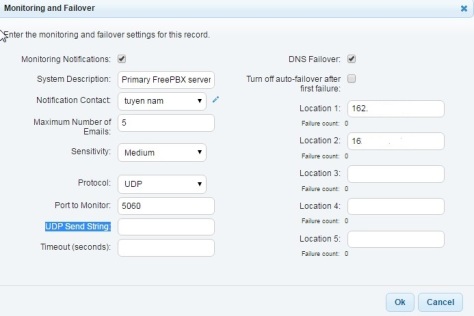
DNS
Using DNS names instead of IP’s for your extensions and configurations has advantages and disadvantages. Some DNS providers have automatic failover of the DNS by monitoring the availability of your primary server. So this could go a long way to providing automatic failover. Otherwise you would have to make the change manually. A disadvantage of using DNS failover is that changes do not take effect immediately. You could set a very low TTL (Time To Live) to try minimize the delay but it could still be awhile before changes take effect. Anywhere from minutes to hours.
Extensions
If you do not use DNS or your phones do not support that you will have to change the IP address of the server that your extensions point to. There may be a delay until the next time the phone re-registers with the server or you may have to reboot the phone after the change.
Trunks
If you are using SIP trunks it will vary depending on the provider. Using IP authentication on 2 subaccounts on the SIP trunk provider end is one possibility if supported. That allows the trunk to be live for outgoing calls on both servers at all times. If using username/password authentication you will also likely need 2 separate subaccounts that use different usernames/passwords. Fortunately, the HA backup/restore feature in FreePBX accounts for that possibility. It allows you to optionally disable restored trunks on the secondary server if they include a registration string.
Inbound Calls
DID numbers allow inbound calls and are typically assigned to one trunk and one subaccount. If you are using a single registration string you would have to enable the trunk(s) on the secondary server when the primary is not functioning. The DID’s should become active on the secondary server as soon as the trunks register. If using IP authentication, the DID number(s) will need to be switched over to the secondary server on the SIP trunk provider end. Some SIP trunk providers support automatic failover for this.
Extension Provisioning
If you provision extensions with TFTP you need to add the tftp folder to the backup schedule. If you do not use DNS, the TFTP IP address will need to be manually changed on the phone. The IP addresses used in the TFTP configurations files on the standby server would need to be changed if you are not using DNS. However, this may not present a problem in the short term because the phones will keep their existing configuration if they cannot find a TFTP server.
Call Detail Records and Voicemail
This procedure is not a realtime mirrored solution so CDR and voicemail will not be current. Since this HA solution is meant to be temporary until the primary server is up and running again, there isn’t much reason to restore CDR on the secondary server. If you do, keep in mind you will erase existing CDR information not present on the primary server each time you restore.
Setting up the SSH connection
I used user asterisk on primary and secondary server. You could use root user but there are security implications. This procedure assumes Apache/FreePBX run as user asterisk in the home directory /var/lib/asterisk. You can check all usernames, home directories, and shell settings by running cat /etc/passwd.
On primary server:
#chsh -s /bin/bash asterisk
#passwd asterisk
somepassword
#chmod 755 /var/lib/asterisk
On secondary server:
#chsh -s /bin/bash asterisk
#su asterisk
$ssh-keygen
Do NOT enter a passphrase when asked.
That last command will create the rsa 2048 bit key pair and save the 2 files in /var/lib/asterisk/.ssh/
Still running in a shell on the secondary server as user asterisk, create the remote directories, remote public key (authorized_keys) file, and set permissions for everything with this one command.
$ssh-copy-id -i asterisk@primaryServerIP
or if using ssh port other than 22
$ssh-copy-id -i '-p xxxx asterisk@PrimaryServerIP'
To test
$ssh asterisk@PrimaryServerIP
or if using ssh port other than 22
$ssh -p xxxx asterisk@PrimaryServerIP
If the secondary server logs into the primary server without asking for a password then the keys are working. First time it will ask to add host fingerprint. It will not work on it’s own in the background until that is done.
Now that keys and fingerprint are added and working remove asterisk password on primary server. SSH login using usernames is not possible by default if there is no password.
On primary server:
#passwd -d asterisk
——————————-
Fix for permission problems
The current version of ssh-copy-id sets permissions with group write which SSH StrictModes does not allow. In addition to this, Freepbx currently resets /var/lib/asterisk folder permission to 775 after each reload. This also violates StrictModes permission limits and causes key authentication to fail.
The simplest solution is to disable SSH StrictModes on the primary server by editing /etc/ssh/sshd_config.
Uncomment and set to no.
StrictModes no
Alternatively you can change asterisk user home directory to /home on both servers and redo this procedure, substituting in the new directory. Then on the primary server as root run the following to fix permissions.
#chmod 700 /home/asterisk
#chmod 700 /home/asterisk/.ssh
#chmod 600 /home/asterisk/.ssh/authorized_keys
——————————-
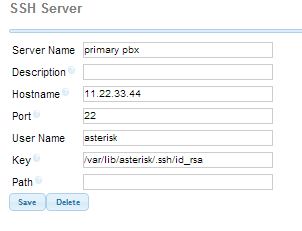
Create the SSH server
Now that we have an SSH connection to the primary server we can create the SSH server in the FreePBX Backup & Restore module on the secondary server. Go to Admin>Backup & Restore>Servers>New SSH Server on the secondary server and enter the relevant information. As shown in screenshot below, the private key file we generated when we ran ssh-keygen is /var/lib/asterisk/.ssh/id_rsa .
Select Backup Items
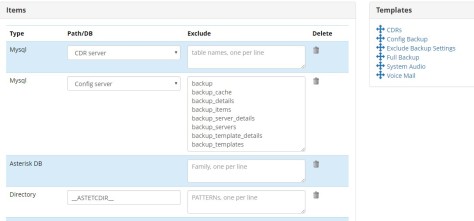
Go to Backups>New Backup and give it a name. Select what you want to backup/restore from the primary server by dragging and dropping the templates. Assuming you want everything you would select the following templates. Full Backup, Exclude Backup Settings, System Audio, Voicemail. You would also go to the bottom and add /tftpboot directory if you are using that.
Adding the “Exclude Backup Settings” template is very important otherwise you will lose all the backup settings we just created when you do the backup/restore from the primary server.

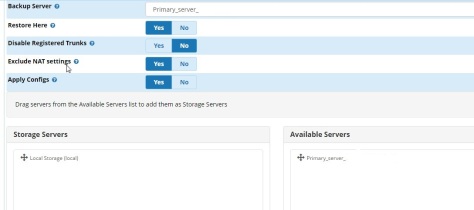
Select the Backup Server, Restore here, local storage, and run schedule. The screen shot below should be self explanatory for that. After selecting ‘Save’ at the bottom you can select ‘Run’ to test. If you are using a registration string for your trunks the ‘Disable Registered Trunks’ box should be checked because you generally cannot have the same registration string for a trunk on two different live PBX servers at the same time. The idea is that you would manually enable it on the secondary server when your primary server is down and you need to switch over.
Consider whether you want to backup/restore Mysql CDR. If you were to make calls on the secondary server they would be logged only on the secondary server CDR. The next time the backup/restore runs it will overwrite those call logs.
Note (Standby Server):
-Exclude NAT Settings.
-Exclude Backup Settings.
-Asterisk Sip Settings: Check If External address and Local Networks are correct?
Configure DNSmadeeasy:
http://help.dnsmadeeasy.com/dns-failover/configure-dns-failover/configure-dns-failover/