VTiger 6.5.0 – Changes are not saved

The fields can be changed but not save.

First try to fully disable strict mode for your tables. If this will not help you try second method.

[mysqld]
sql_mode=””

[mysqld]
sql_mode=ONLY_FULL_GROUP_BY,NO_ZERO_IN_DATE,NO_ZERO_DATE,ERROR_FOR_DIVISION_BY_ZERO,NO_AUTO_CREATE_USER,NO_ENGINE_SUBSTITUTION

Where to find this config file? It depends of your server configuration. Usualy:
/etc/my.cnf,
/etc/mysql/my.cnf

Prevent hacking thankuohoh in Elastix/Freepbx – Many unwanted outgoing calls

Hack thankuohoh generates a high volume of outgoing calls on an Elastix switch which can cause a high cost in line billing.

The hack takes advantage of a vulnerability in the Elastix A2billing package (effect with elastix 2.x and old Freepbx version). When reviewing the call reports will appear something similar as the image:

thankuohoh

1/ This hack can be detected by reviewing the file /etc/asterisk/extensions_custom.conf and find the following lines:

[thanku-outcall]; thankuohoh
exten => _.,1,Macro(user-callerid,LIMIT,EXTERNAL,); thankuohoh
exten => _.,n,Set(MOHCLASS=${IF($["${MOHCLASS}"=""]?default:${MOHCLASS})}); thankuohoh
exten => _.,n,Set(_NODEST=); thankuohoh
exten => _.,n,Macro(dialout-trunk,2,${EXTEN},,on); thankuohoh
exten => _.,n,Macro(dialout-trunk,3,${EXTEN},,on); thankuohoh
exten => _.,n,Macro(dialout-trunk,4,${EXTEN},,on); thankuohoh
exten => _.,n,Macro(dialout-trunk,5,${EXTEN},,on); thankuohoh
exten => _.,n,Macro(dialout-trunk,6,${EXTEN},,on); thankuohoh
exten => _.,n,Macro(dialout-trunk,7,${EXTEN},,on); thankuohoh
exten => _.,n,Macro(dialout-trunk,8,${EXTEN},,on); thankuohoh
exten => _.,n,Macro(dialout-trunk,9,${EXTEN},,on); thankuohoh
exten => _.,n,Macro(outisbusy,); thankuohoh

-Once the malicious code was removed, it is recommended to apply a security layer in the portal’s web access as indicated in the following:

2/ Configure Apache in Elastix to request user and password when accessing the web portal

The following will show how to configure Apache in Elastix to request user and password every time someone tries to enter the web portal.

This is convenient on an Elastix switch since it adds an extra layer of security and prevents it from being scanned or indexed and that can take advantage of some vulnerability that has the html code.

-To begin with the configuration, enter the console of the server and type the following:

vi /etc/pam.d/su

-Once we enter the file, we uncomment the line “auth required pam_wheel.so use_uid” and record when exiting as it appears in the image:

Passwd_apache1
– We create the user that will be used to validate the entrance to the web page. For this step we created a User Wheel and its name would be “adminportal”. In console type the following:

adduser -G wheel -m -s /bin/bash adminportal

-We configure the password:

passwd adminportal

-We execute the following command line to edit the file:

vi /etc/httpd/conf.d/elastix.conf

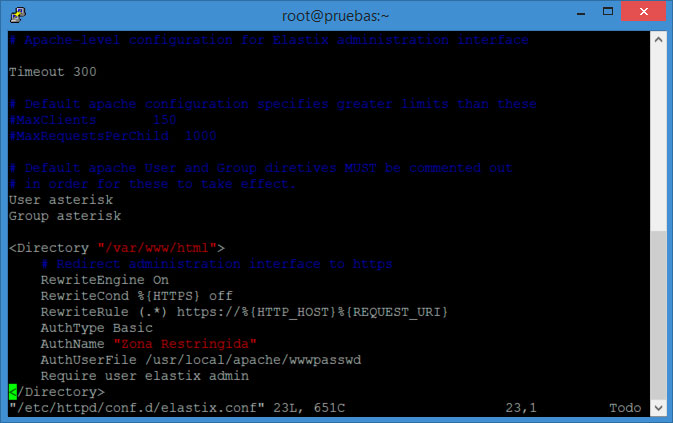
-Localizamos the line “RewriteRule (. *) Https: //% {HTTP_HOST}% {REQUEST_URI}” and we add the following code:

AuthType Basic
AuthName "Acceso restringido"
AuthUserFile /usr/local/apache/wwwpasswd
Require user elastix adminportal

-We should stay as shown in the following image, and record:

Passwd_apache2


– We added the user to apache authentication and configured his password by executing the following lines:

mkdir /usr/local/apache

htpasswd -c /usr/local/apache/wwwpasswd adminportal

– Finally, we restart the Apache service so that the changes are applied:

service httpd restart

-With this, we can already try to enter the door of Elastix and ask us for password only when entering the site.

Passwd_apache3

3/ Moving/Deleting A2billing and VtigerCrm in /var/www/html


For more information, you can access the following link:

Http://bugs.elastix.org/view.php?id=2169

I hope this guide is useful to you. (Source from Internet of miguelmuzquiz)


HOW TO INSTALL ZABBIX 3.2 SERVER ON CENTOS 7 / RHEL 7

[root@zabbix ~]# yum update -y
[root@zabbix ~]# yum install httpd -y
[root@zabbix ~]# yum install php php-cli php-common php-devel php-pear php-gd php-mbstring php-mysql php-xml -y
[root@zabbix ~]# yum install mariadb-server -y
[root@zabbix ~]# systemctl enable httpd && systemctl start httpd
[root@zabbix ~]# systemctl enable mariadb && systemctl start mariadb

– Don’t forget to set a password for the root using mysql_secure_installtion, take a look to this tutorial: Securing MySQL server / Mariadb with mysql_secure_installation

Step 1 – Install Zabbix Server with MySQL

[root@zabbix ~]# rpm –import http://repo.zabbix.com/RPM-GPG-KEY-ZABBIX
[root@zabbix ~]# rpm -ivh http://repo.zabbix.com/zabbix/3.2/rhel/7/x86_64/zabbix-release-3.2-1.el7.noarch.rpm

[root@zabbix ~]# yum install zabbix-server-mysql zabbix-web-mysql zabbix-agent zabbix-get zabbix-sender zabbix-java-gateway -y

Step 2 – Edit PHP timezone

Open the file /etc/httpd/conf.d/zabbix.conf created by Zabbix with your favourite editer

[root@zabbix ~]# vi /etc/httpd/conf.d/zabbix.conf

It’s necessary to uncomment the “date.timezone” setting and set the right timezone for you.

php_value date.timezone Europe/Rome

Save the file and don’t forget to reload httpd service using the below command

 [root@zabbix ~]# systemctl reload httpd

Step 3 – Edit create and import initial zabbix database and user

First we need to create zabbix database (zabbixdb) and create a zabbix user (zabbixuser).

[root@zabbix ~]# mysql -u root -p

CREATE DATABASE zabbixdb CHARACTER SET utf8 COLLATE utf8_bin;
GRANT ALL PRIVILEGES ON zabbixdb.* TO zabbixuser@localhost IDENTIFIED BY "Password";
FLUSH PRIVILEGES;

– After creating the zabbix database and user we need to import the zabbix initial database using the below commands (make sure to change zabbix-server-mysql-3.2.X to the correct version number):

[root@zabbix ~]# zcat /usr/share/doc/zabbix-server-mysql-3.2.x/create.sql.gz | mysql -uroot -p zabbixdb

– Now we need to edit database configuration in the zabbix server configuration file zabbix_server.conf

[root@zabbix ~]# vi /etc/zabbix/zabbix_server.conf

Specify the database name for zabbix , database user name and the password

DBHost=localhost
DBName=zabbixdb
DBUser=zabbixuser
DBPassword=Password

Step 4 – Set SELinux settings and adjust Firewall

[root@zabbix ~]# setsebool -P httpd_can_network_connect=1
[root@zabbix ~]# setsebool -P httpd_can_connect_zabbix=1
[root@zabbix ~]# setsebool -P zabbix_can_network=1


[root@zabbix ~]# firewall-cmd --permanent --add-service=http
success
[root@zabbix ~]# firewall-cmd --permanent --zone=public --add-port=10051/tcp
success
[root@zabbix ~]# firewall-cmd --permanent --zone=public --add-port=10050/tcp
success
[root@zabbix ~]# firewall-cmd --reload
success

After adjusting the Selinux settings and the firewall we need to enable and start zabbix service on boot using the bellow commands

[root@zabbix ~]# systemctl enable zabbix-server && systemctl start zabbix-server
[root@zabbix ~]# systemctl enable zabbix-agent && systemctl start zabbix-agent

Step 5 – Configure Zabbix via Web console

– Navigate to http://ip_address/zabbix or http://host_name/zabbix

Now you’ll be redirected to the zabbix web console page after finishing configuration. Enter the default username and password Admin/zabbix.

Last thing to do is to enable your server zabbix to be monitored: go to Configuration -> Hosts. Select the host (zabbix server) and click “Disabled”