Category Archives: Backup Servers

Automating backups with tar

  1. Create the backup script backup.cron file, touch /etc/cron.daily/backup.cron and add the following lines to this backup file:
    #!/bin/sh
    # full and incremental backup script
    
    #Change the 5 variables below to fit your computer/backup
    
    COMPUTER=deep                           	# name of this computer
    DIRECTORIES="/home"                     	# directoris to backup
    BACKUPDIR=/backups                      	# where to store the backups
    TIMEDIR=/backups/last-full              	# where to store time of full backup
    TAR=/bin/tar                            		# name and locaction of tar
    
    #You should not have to change anything below here
    
    PATH=/usr/local/bin:/usr/bin:/bin
    DOW=`date +%a`              		# Day of the week e.g. Mon
    DOM=`date +%d`              		# Date of the Month e.g. 27
    DM=`date +%d%b`             	# Date and Month e.g. 27Sep
    
    # On the 1st of the month a permanet full backup is made
    # Every Sunday a full backup is made - overwriting last Sundays backup
    # The rest of the time an incremental backup is made. Each incremental
    # backup overwrites last weeks incremental backup of the same name.
    #
    # if NEWER = "", then tar backs up all files in the directories
    # otherwise it backs up files newer than the NEWER date. NEWER
    # gets it date from the file written every Sunday.
    
    
    # Monthly full backup
    if [ $DOM = "01" ]; then
            NEWER=""
            $TAR $NEWER -cf $BACKUPDIR/$COMPUTER-$DM.tar $DIRECTORIES
    fi
    
    # Weekly full backup
    if [ $DOW = "Sun" ]; then
            NEWER=""
            NOW=`date +%d-%b`
    
            # Update full backup date
            echo $NOW > $TIMEDIR/$COMPUTER-full-date
            $TAR $NEWER -cf $BACKUPDIR/$COMPUTER-$DOW.tar $DIRECTORIES
    
    # Make incremental backup - overwrite last weeks
    else
    
            # Get date of last full backup
            NEWER="--newer `cat $TIMEDIR/$COMPUTER-full-date`"
            $TAR $NEWER -cf $BACKUPDIR/$COMPUTER-$DOW.tar $DIRECTORIES
    fi
    

    Here is an abbreviated look of the backup directory after one week:

    [root@deep] /# ls -l /backups/
    
    
    total 22217
    -rw-r--r--   	1 root     root     	 10731288 	Feb  7 11:24 deep-01Feb.tar
    -rw-r--r--   	1 root     root            	6879 	Feb  7 11:24 deep-Fri.tar
    -rw-r--r--   	1 root     root         	2831 	Feb  7 11:24 deep-Mon.tar
    -rw-r--r--   	1 root     root            	7924 	Feb  7 11:25 deep-Sat.tar
    -rw-r--r--   	1 root     root     	 11923013 	Feb  7 11:24 deep-Sun.tar
    -rw-r--r--   	1 root     root            	5643 	Feb  7 11:25 deep-Thu.tar
    -rw-r--r--   	1 root     root            	3152 	Feb  7 11:25 deep-Tue.tar
    -rw-r--r--   	1 root     root            	4567 	Feb  7 11:25 deep-Wed.tar
    drwxr-xr-x	2 root     root         	1024 	Feb  7 11:20 last-full
    

    Backup directory of a week

    The directory where to store the backups BACKUPDIR, and the directory where to store time of full backup TIMEDIR must exist or be created before the use of the backup-script, or you will receive an error message.

  2. If you are not running this backup script from the beginning of the month 01-month-year, the incremental backups will need the time of the Sunday backup to be able to work properly. If you start in the middle of the week, you will need to create the time file in the TIMEDIR. To create the time file in the TIMEDIR directory, use the following command:
    [root@deep] /# date +%d%b < /backups/last-full/myserver-full-date
    

    Where /backups/last-full is our variable TIMEDIR wherein we want to store the time of the full backup, and myserver-full-date is the name of our server e.g. deep, and our time file consists of a single line with the present date i.e. 15-Feb.

  3. Make this script executable and change its default permissions to be writable only by the super-user root 755.
    [root@deep] /# chmod 755 /etc/cron.daily/backup.cron
    

Because this script is in the /etc/cron.daily directory, it will be automatically run as a cron job at one o’clock in the morning every day.

Backup Configuration

For cPanel & WHM 54

( Home >> Backup >> Backup Configuration )

Overview

The Backup Configuration interface allows system administrators to customize their scheduled backups.

Warning:

We strongly recommend that you only use the Backup Configuration interface to configure backups of your server. We plan to remove the Legacy Backup Configuration interface (Home >> Backup >> Legacy Backup Configuration) from WHM in a future release.

Note:

The system applies the current Backup Configuration settings to accounts that you create or transfer.

To enable and run backups, you must complete both of the following steps:

  1. Select Enable for the Backup Status setting in this interface’s Global Settings section.
  2. Select your desired settings for the Backup Configuration feature.
  3. Use the Backup User Selection interface (Home >> Backup >> Backup User Selection) to enable backups for each desired cPanel user.

    Note:

    To enable or disable the Backup Configuration feature for all users, select the checkbox in the top right corner of the Backup User Selection interface.

Global Settings

You can configure the following global backup settings:

Setting
Description
Backup Status Enable this setting to run the updated Backup Configuration feature. This setting defaults to Enable.
Backup Type Choose one of the following options to determine how the system stores backup files:

  • Compressed — Select this setting to save all of your information in a compressed format. This setting uses less disk space, but requires more time to complete.
  • Uncompressed — Select this setting to save all of your information in an uncompressed format. This setting uses more disk space, but is faster than Compressed backups.
  • Incremental — Select this setting to store only one uncompressed backup file. The system saves updated account information to the existing backup file, and remove the old information that these updates replace. This setting limits your restoration settings, but runs faster and uses less disk space than other backup types.

    Warning:

    If you choose to use Incremental backups, you cannot restore the account to a time before your last backup.

Maximum destination timeout in seconds Enter the maximum number of seconds to allow a backup process to upload a single backup file or restore a single backup file.

Note:

We strongly recommend that you enter a number of seconds that is large enough for the system to upload your largest backup file.

Scheduling and Retention

The Scheduling and Retention settings allow you to specify when the backup process runs. You may choose to run backups on a daily, weekly, or monthly basis, or you may use a combination of these settings. Select the checkboxes that correspond to the timing settings that you wish to use.

Note:

You must select at least one of the following settings.

Setting
Description
Backup Daily Your system creates a new backup on each of the days of the week that you select. When you select this setting, you mustalso configure the following settings:

  1. Select the days of the week on which you wish to run backups.
  2. In the Retain Daily backups text box, enter the maximum number of daily backup files to store on your system at any given time. Enter any number between 1 and 9999.
Backup Weekly Your system creates a new backup once each week, on the day that you select. When you select this setting, you must also configure the following settings:

  1. Select the day of the week on which you wish to run backups.
  2. In the Retain Weekly backups text box, enter the maximum number of weekly backups to store on your system at any given time. Enter any number between 1 and 9999.
Backup Monthly Your system creates a new backup either once or twice per week, on the days of the month that you select. When you select this setting, you must also configure the following settings:

  1. Select the day or days of the month on which you wish to run backups.
  2. In the Retain Monthly backups text box, enter the maximum number of monthly backups to store on your system at any given time. Enter any number between 1 and 9999.

Note:

If you run daily and monthly backups on the same day, the daily backup runs first, and then the monthly backup copies the daily backup.

Files

The Files settings allow you to configure the information that you wish to back up. Select the checkboxes that correspond to the settings that you wish to use.

Warning:

You must select either the Backup Accounts or Backup System Files checkbox in order to run backups.

Setting
Description
Backup Accounts Back up the user files in each cPanel user’s home directory.

Note:

Click Select Users to open the Backup User Selection interface (Home >> Backup >> Backup User Selection).

After you select this setting, select the type of data to include in the backup file:

  • Backup Suspended Accounts — Select the Enable button to back up suspended accounts.

    Warning:

    If you do not enable this option, your server will not back up suspended accounts, regardless of their settings in the Backup User Selection interface ( Home >> Backup >> Backup User Selection ).

  • Backup Access Logs — Select the Enable button to back up your server’s access logs and the/usr/local/cpanel/domlogs file.
  • Backup Bandwidth Data — Select the Enable button to back up your server’s bandwidth data.
  • Use Local DNS — Select the method to use to back up DNS information:
    • Disable — The system backs up DNS information from the DNS cluster.
    • Enable — The system backs up DNS information from the server for the domain.
Backup System Files Back up your server’s system files.

Notes:

  • The system stores many of these files in the /etc directory.
  • You must enable this setting for server restoration, but it is not necessary for account restoration. We strongly recommend that you enable this setting.
  • For more information, read our System Backups documentation.

Databases

Select one of the following options for the Backup SQL Databases setting, to determine how to back up SQL databases:

Setting
Description
Per Account Only Only back up the databases for each account. This setting uses the mysqldump utility.
Entire MySQL Directory Back up all of the databases on the server. This backs up the entire /var/lib/mysql/ directory.
Per Account and Entire MySQL Directory Perform a comprehensive backup that copies all of the databases for each individual account, as well as all of the databases on the server.

Configure Backup Directory

The following settings allow you to specify where you wish to save your backups.

Warning:

  • We strongly recommend that you save your backups to a remote location in addition to a local destination.
  • If you do not select the Retain backups in the default backup directory setting and do not specify a destination in the Additional Destinations setting, the system will return the following error: Error: Nowhere to back up: no enabled destinations found and retaining local copies is disabled.
  • The backup process and the transfer process use separate queues. If each backup finishes much faster than each transfer, backup files can accumulate on the server and fill the hard drive.
  • Perform backups to NFS mount points at your own risk. If you choose a NFS mount point, you risk data loss if there is a network interruption or if you did not properly configure NFS.
  • To prevent performance degradation, the system automatically disables quotas on non-root filesystems that contain a backup destination.
Setting
Description
Default Backup Directory To change the default backup directory, enter the absolute path to the desired directory location.

Note:

By default, the system saves backup files locally, to the /backup/ directory.

Retain backups in the default backup directory. Select this checkbox to retain each account backup in the /backup/ directory after the backups transfer to another destination.

If you do not select this setting, your server deletes account backup files from the /backup/ directory only after the following events occur:

  • The system successfully transfers the backup file to at least one additional destination.
  • The system attempts, successfully or unsuccessfully, to transfer the backup file to all of your additional destinations.

Note:

This setting does not cause the system to remove system backup files, directories, or other files.

Mount Backup Drive as Needed. Select the Enable button to mount a backup drive. This setting requires a separate mount point and causesthe Backup Configuration process to check the /etc/fstab file for a backup mount.

  • If a mount exists with the same name as the staging directory, the Backup Configuration process mounts the drive and backs up the information to the mount.
  • After the backup process finishes, it dismounts the drive.

If you select the Disable button, the Backup Configuration process does not check the /etc/fstab file for a mount.

Additional Destinations

You can save your backups to additional destinations. Each additional destination may increase the amount of time that the backup process requires. If the process runs too long, it may interfere with the next backup process.

Notes:

  • To restore backups that exist in the additional destinations that you create, perform a remote restoration. For more information, read our Remote Restoration documentation.
  • If you use the Incremental backup type, you cannot add additional destinations.
  • To save your updated destination but not validate your changes, click Save Destination.
  • To automatically validate your information after you save your changes, click Save and Validate Destination.

Select a destination type from the menu and click Create new destination. A new section for the selected destination type will appear.

Warning:

Only transfer system backup files over encrypted connections. The following destination types use encrypted connections:

  • Amazon S3™
  • SFTP
  • WebDAV with SSL Enabled

The Additional Local Directory type does not transfer your data from the server, so that method is secure.

Select a tab to view information for that destination type:

Setting
Description
Destination Name Enter a destination name for your backup file. This name appears in your destination table.
Transfer System Backups to Destination Select this checkbox to transfer system backups to an additional destination.

Warning:

Only transfer system backup files over encrypted connections.

Backup Directory Enter the directory path in which you wish to store backups.

Note:

This setting is optional.

Remote Host Enter the hostname or IP address of the remote server.

Important:

  • Do not include http://, https://, a trailing port, or path information in the address that you enter.
  • Do not use local hosts or loopback addresses.
Port Enter the port to use to communicate with the remote server. By default, SFTP destinations use port 22.
Remote Account Username Enter the username of the account on the remote server.
Authentication Type Select how you wish to authenticate to the remote server:

  • Key Authentication — Select this button to use key-based authentication. We strongly recommend that you use this method.
  • Password Authentication — Select this button to use password-based authentication.
Key Authentication Options If you selected the Key Authentication button for the Authentication Type setting, enter the following information:

  • The full path of the private key on this server, in the Private Key text box.

    Note:

    Click Generate a new key to generate a new private key.

  • The passphrase for this server, in the Passphrase text box.
Password Authentication Options If you selected the Password Authentication button for the Authentication Type setting, enter the password for the account on the remote server in the Remote Password text box. Unless you specify a new password, the server uses the existing password.
Timeout Enter the maximum amount of time in seconds that you want the server to wait for a response from the remote server before it generates errors.

  • You must enter a number between 30 and 300.
  • If the server does not respond in this time frame, it makes two additional attempts to contact the server.
  • If the server does not respond after those attempts, the system administrator receives an email that notes the failed attempts, and the system attempts a transfer again the next time that backups run.

Save Configuration

After you configure the desired settings, click Save Configuration at the bottom of the Backup Configuration interface.

To reset all of the settings in the Backup Configuration interface to the default settings, click Reset.

Run backups manually

To run a backup manually, run the following command:

/usr/local/cpanel/bin/backup

If the backup is up-to-date but you still wish to perform a backup, run the following command:

/usr/local/cpanel/bin/backup --force

To use a custom packaging script, perform the following steps:

  1. Copy the /usr/local/cpanel/scripts/pkgacct file and modify it.
  2. Store the modified pkgacct file in the /var/cpanel/lib/Whostmgr/Pkgacct/pkgacct directory.
  3. Run the /usr/local/cpanel/bin/backup command with the --allow-override flag.

Backup files and directories

When you select Backup Configuration Files, cPanel & WHM backs up the following files and directories:

cPanel & WHM backs up the following files and directories:

Files

1
2
3
4
5
6
7
8
9
10
11
12
13
14
15
16
17
18
19
20
21
22
23
24
25
26
27
/etc/exim.conf
/etc/exim.conf.local
/etc/exim.conf.localopts
/etc/namedb/named.conf
/etc/rc.conf
/etc/named.conf
/etc/proftpd.conf
/etc/localdomains
/etc/httpd/conf/httpd.conf
/etc/group
/etc/shadow
/etc/master.passwd
/etc/passwd
/etc/fstab
/etc/ips
/etc/ips.remotemail
/etc/ips.remotedns
/etc/reservedips
/etc/reservedipreasons
/etc/quota.conf
/etc/wwwacct.conf
/etc/remotedomains
/etc/rndc.conf
/etc/secondarymx
/etc/my.cnf
/root/.my.cnf
/usr/local/apache/conf/httpd.conf

Directories

1
2
3
4
5
6
7
8
9
10
11
12
13
14
15
16
17
18
19
/etc/namedb
/etc/valiases
/etc/proftpd
/etc/vdomainaliases
/etc/ssl
/etc/vfilters
/usr/local/frontpage
/usr/share/ssl
/usr/local/cpanel/3rdparty/mailman
/var/lib/rpm
/var/lib/named/chroot/var/named/master
/var/named
/var/cpanel
/var/spool/cron
/var/cron/tabs
/var/spool/fcron
/var/log/bandwidth
/var/ssl
/var/lib/mysql

To configure system backups to include custom files or directories, create a new file or directory in the /var/cpanel/backups/extrasdirectory (for example, /var/cpanel/backups/extras/etc). In that file, enter an absolute path to any files that you wish to back up (for example, /etc/example.conf).

Note:

The server administrator can edit the /etc/my.cnf file to change the MySQL data directory location. In such a case, WHM will back up the directory at its new location.


Additional documentation

  • Backup Restoration — Restore your backup with the Backup Restoration interface.
  • Remote Restoration — Restore backups in the Additional Destinations locations that you created.
  • System Backups — Upload system backups to your chosen backup destinations.

How to Move All cPanel Accounts from One Server to Another

Introduction

This tutorial explains how to migrate your cPanel accounts, SSL certificates, and main server IP address from one server to another.Typically, you would do this when you need to replace your server.

Note:

This procedure assumes that your server’s IP addresses are portable, and that you can migrate them from the old server to the new server. If you use a third-party data center or hosting provider for your cPanel server, contact them to confirm that you can migrate your IP addresses.

Warning:

Your websites will likely experience downtime during this process.

Migrate your cPanel accounts


Install cPanel & WHM on your new server

Before you transfer the accounts, install cPanel & WHM on your new server. To do so, follow the steps in our Installation Guide.

During the installation process, select a hostname and main IP address for the new server.

Important:

  • You must select a main IP address that is different from your old server.
  • You should, however, select the same hostname, shared IP address, and nameservers as your old server. This is important because the system configures the DNS zone files of restored accounts with those settings. You can do this in WHM’s Basic cPanel & WHM Setup interface (Home >> Server Configuration >> Basic cPanel & WHM Setup).

Notes:

  • cPanel, Inc. automatically provides you with free 15-day trial license when you install cPanel & WHM on a new server. However, if the Trial License Interface shows that your IP address is not eligible for a trial license,contact Customer Service.
  • The migration process will transfer your permanent license to the new server.


Copy all accounts to the new server

Important:

If you do not use a SNI-capable operating system, be sure to copy all SSL certificates before you switch servers. SSL certificates and keys exist in the /etc/ssl/ directory.

After you install cPanel & WHM on your new server, copy each account from your old server to your new server. To move all of your accounts from one server to another, follow the steps listed in WHM’s Transfer Tool interface (Home >> Transfers >> Transfer Tool).


Shut down your old server

Important:

Before you begin Step 3, if your old server is a member of a DNS cluster, delete the DNS clusters in WHM’s DNS Cluster interface (Home >> Clusters >> DNS Cluster).

After you copy your accounts to the new server, you can shut down your old server.


Change the new server’s main IP address to the old server’s IP address

After you shut down your old server, change the new server’s main IP address to the IP address of your old server. Perform this action via the command line in a local session. A local session allows you to make changes, restart the network service, and stay connected to the server.

To change the server’s main IP address, perform the following steps:

  1. Open the /etc/sysconfig/network-scripts/ifcfg-eth0 file with a text editor.
  2. Edit the IPADDR and GATEWAY lines to use the IP address and gateway of your old server.
  3. Open the /etc/ips file with a text editor.
  4. Add your old server’s primary IP address, net mask, and gateway to the file.

    Note:

    Remove the new server’s primary IP address from this file if it is present.

  5. Restart the network service with the following commands:
    • For CentOS, CloudLinux™, and Red Hat® Enterprise Linux (RHEL) 6 and earlier, and Amazon Linux, run the service network restart command.

      Note:

      Amazon Linux always runs in a NAT configuration.


    • For CentOS, CloudLinux, and RHEL 7 and later, run the systemctl restart network command.
  6. Run the /scripts/mainipcheck command to add the IP address to the /var/cpanel/mainip file.
  7. Run the /scripts/fixetchosts command to add the IP address and hostname of your server to the /etc/hosts file.


Change the IP address of all accounts to the correct IP address

After you transfer the accounts to the new server, the system may have set the IP addresses of the accounts to the new server’s original main IP address. You must change each account’s IP address to the current IP address with WHM’s IP Migration Wizard interface (Home >> IP Functions >> IP Migration Wizard).


Join the new server to the DNS cluster

Note:

If your server is not a member of a DNS Cluster, skip ahead to Step 7.

To add the new server to the DNS cluster, perform the following steps:

  1. Navigate to WHM’s DNS Cluster interface (Home >> Clusters >> DNS Cluster).
  2. Select Enable DNS Clustering.
  3. Click Change.
  4. Click Return to Cluster Status.
  5. Select the server to add to the DNS cluster from the Add a new server to the cluster menu.
  6. Click Configure.


Reinstall all SSL certificates

Note:

Skip ahead to Step 8 if your server meets the following conditions:

  • The accounts on your server do not use SSL certificates from a Certificate Authority.
  • Both of your servers use an SNI-capable operating system.

To upload an existing SSL certificate to your server, perform the following steps:

  1. Navigate to WHM’s Install an SSL Certificate on a Domain interface (Home >> SSL/TLS >> Install an SSL Certificate on the Domain).
  2. Paste the certificate into the text box, or click Fetch to upload a *.crt file.
  3. Click Submit to install the certificate onto the server.


Confirm your cPanel license is valid

After you move all of your accounts to your new server, confirm that your cPanel license is valid. To do so, go to our License Verification interface.

WordPress Backups

Your WordPress database contains every post, every comment and every link you have on your blog. If your database gets erased or corrupted, you stand to lose everything you have written. There are many reasons why this could happen and not all are things you can control. With a proper backup of your WordPress database and files, you can quickly restore things back to normal.

Instructions to back up your WordPress site include:

  1. WordPress Site and your WordPress Database
  2. Automatic WordPress backup options

In addition, support is provided online at the WordPress Support Forum to help you through the process.

Site backups are essential because problems inevitably occur and you need to be in a position to take action when disaster strikes. Spending a few minutes to make an easy, convenient backup of your database will allow you to spend even more time being creative and productive with your website.

Backup Questions

Back up your database regularly, and always before an upgrade.

How often should you back up? 
That depends on how often you blog, how often you want to do this, and how you would feel if your database were lost along with a few posts. It is your decision.
Can you use this method to back up other data? 
Yes. Backups are good all around.
How many backups should I keep? 
The general rule of thumb is to keep at least three backups and keep them in three different places or forms, like CD/DVDs, different hard drives, a thumbdrive, web disk, your e-mail account, etc. This prevents problems if a single backup becomes corrupted or damaged.
My database backups are huge! Can I do anything about that? 
Typically, anti-spam and statistics WordPress Plugins can add large amounts of data and because they are constantly gathering information, the database can swell significantly. When backing up the database, such information is probably not important to keep. Do not mark those tables for backup when selecting them during the backup process.
Can backups be automated? 
Yes. There are several methods of automating the backup process available, and we’ve listed some in the Automatic WordPress backup section. However, it is highly recommended that you back up those auto backups with a manual backup once in a while to guarantee that the process is working.
Is there more information on backing up WordPress available? 
Yes. See Backup Resources for more information.

Backup Documentation

The following are general documents for helping you to back up and restore your WordPress data.

Backing Up Your WordPress Site

There are two parts to backing up your WordPress site: Database and Files. You need to back up the entire site, and you need to back up your WordPress database. Below are instructions for backing up your WordPress database for various server programs. We will start with backing up the rest of your WordPress site.

Your WordPress site consists of the following:

  1. WordPress Core Installation
  2. WordPress Plugins
  3. WordPress Themes
  4. Images and Files
  5. JavaScript and PHP scripts, and other code files
  6. Additional Files and Static Web Pages

All of these are used in various combinations to generate your website. The database contains your posts and a lot of data generated on your site, but it does not include the above elements that all come together to create the look and information on your site. These need to be saved.

Most hosts back up the entire server, including your site, but it takes time to request a copy of your site from their backups, and a speedy recovery is critical. You need to learn how to back up your own site files and restore them.

Here are some methods to backup your site files:

Website Host Provided Backup Software 
Most website hosts provide software to back up your site. Check with your host to find out what services and programs they provide.
Create Sync With Your Site 
WinSCP and other programs allow you to sync with your website to keep a mirror copy of the content on your server and hard drive updated. It saves time and makes sure you have the latest files in both places.
Copy Your Files to Your Desktop 
Using FTP Clients or UNIX Shell Skills you can copy the files to a folder on your computer. Once there, you can zip or compress them into a zip file to save space, allowing you to keep several versions.

Remember, keep at least three backups on file, just in case one is corrupted or lost, and store them in different places and on different mediums, like CD, DVD, different hard drives, etc.

Database Backup Instructions

Back up your WordPress database regularly, and always before an upgrade or move to a new location. The following information will help you back up your WordPress database using various popular server software packages. For detailed information, contact your website host for more information.

Accessing phpMyAdmin

See phpMyAdmin for more information on phpMyAdmin.

While familiarity with phpMyAdmin is not necessary to back up your WordPress database, these instructions should take you step-by-step through the process of finding phpMyAdmin on your server, then you can follow the instructions below as a simple and easy backup or for more detailed instructions see Backing Up Your Database.

Plesk

On your Websites & Domains screen, click Open button corresponding to the database you have set up during the WordPress installation. This will open phpMyAdmin interface:

wp db bu3.png

If you cannot see the Open button, make sure to close the Start creating your website prompt:

wp db bu.png

Click Select Existing Database to find select your WordPress database:
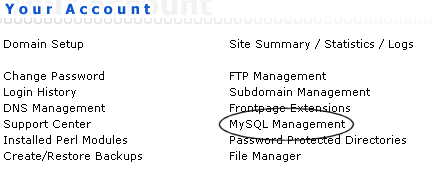
wp db bu2.png

cPanel

On your main control panel for cPanel, look for the MySQL logo and click the link to MySQL Databases. On the next page, look forphpMyAdmin link and click it to access your phpMyAdmin.

cPanel Access Databases

cPanel Access to phpMyAdmin

Direct Admin

From Your Account page, look for MySQL Management and click it to access phpMyAdmin.

Direct Admin Access Databases

Direct Admin Access to phpMyAdmin

Ensim

Look for the MySQL Admin logo and click the link. Under Configuration choose MySQL Administration Tool.

ensim1.png

ensim2.png

vDeck

From the main control panel, click Host Manager, then click Databases. In the next window, click Admin. Another window will popup taking you to the phpMyAdmin login screen.
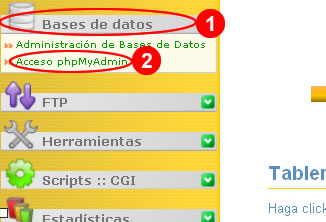
vDeck choose Host Manager

vdeck1-2.png

vdeck2.png


Ferozo

Login to your Ferozo Control Panel by using your credentials. Once inside, go to the “Base de Datos” (“Data Base”) menu and then click on “Acceso phpMyAdmin” (“Access phpMyAdmin”). A new window will open displaying the phpMyAdmin login screen.

ferozo-backup.jpg


Simple Backup with phpMyAdmin

The following is a very simple version of how to use phpMyAdmin to back up your WordPress database. For more detailed information see WordPress Backups and Backing Up Your Database. Once you have discovered how to access your site’s phpMyAdmin, follow these simple instructions.

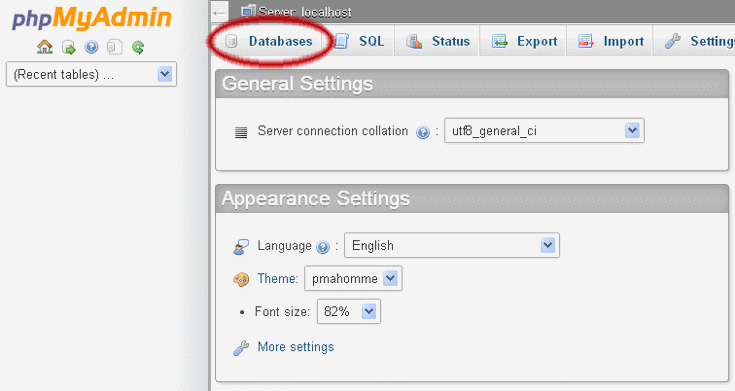
1. Click on Databases in your phpMyAdmin panel. (It may not be necessary to do this, depending on your version of phpMyAdmin)

phpMyAdmin-4.0.5.png

2. You may have several databases. Click the one that holds your WordPress data, the database you created when you installed WordPress. (In older versions this may be done through a pull-down menu.)

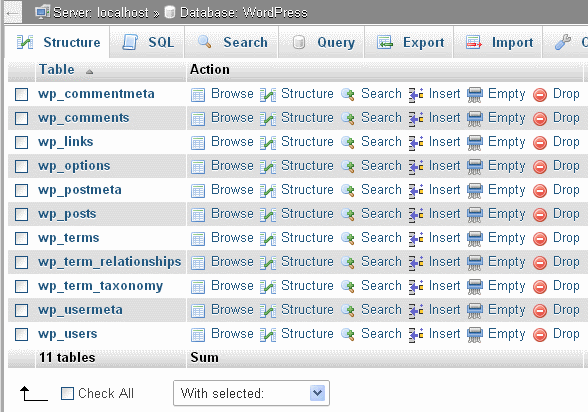
3. Below is a picture of the default tables in the Structure view tab. You may have more tables — this would happen if you have any statistics plugins or anti-spam plugins.

phpMyAdmin-4.0.5-structure.png

4. Click Export. There are two methods to export, Quick and Custom; if you choose Custom, follow these steps:

  1. Select all the tables.
  2. In the Output section check Save output to a file and select None for Compression. (If your database is very large use a compression method)
  3. Select SQL from the Format drop-down menu.
  4. Check “Add DROP TABLE”: this can be useful for over-writing an existing database.
  5. Check “IF NOT EXISTS”: this prevents errors during restores if the tables are already there.
  6. Click Go. The data will now be saved into your computer.

5. Keep these files safe, copied and stored in separate places on separate media.

Automatic Backups

Various plugins exist to take automatic scheduled backups of your WordPress database. This helps to manage your backup collection easily. You can find automatic backup plugins in the Plugin Browser on the WordPress Administration Screens or through the WordPress Plugin Directory.

How to Migrate a Web Server Running Apache, MySQL, WordPress and Drupal

1. Copy Apache Config Files

# ssh username@oldserver

# scp /etc/apache2/sites-available/ user@newserver:/etc/apache2/sites-available/

This will copy all the apache config files over to the new server. Now enable all the sites you copied by creating a symbolic link for each .config file you copied in sites-enabled.

# ln -s /etc/apache2/sites-available/yourwebsite.com.conf /etc/apache2/sites-enabled/yourwebsite.com.conf

or use the command a2ensite which does the same thing for you

# a2ensite yourwebsite.com

Restart apache for the changes to take effect.

# /etc/init.d/apache2 restart

2. Copy Your Websites

# scp -r /var/www/ username@newserver:/var/www

Default WordPress and Drupal installs are just files and we have now copied them across. However all the content, comments etc are stored within MySQL so lets migrate that now.

3. Migrate MySQL

Start by being logged into the old server.

# mysqldump --all-databases -u root -p > backup.sql

# scp backup.sql username@newserver:/home/username/

# ssh username@newserver

# mysql -u root -p < backup.sql

What we did here was use mysqldump to script every database and its contents into several sql commands. Then we copied them to the new server and piped them into the new sql server. All our databases, users and table contents have been imported. Magic.

4. DNS Migration

Now all you need to do is reconfigure your DNS servers to point to the new IP address. Chances are your not hosting your own DNS server so you will have to update them using your provider’s web interface. A word of advice though, create a new entry like test.yourdomain.com and point it to the new server first to make sure everything works.

How to Back Up and Restore a MySQL Database

Back up From the Command Line (using mysqldump)

If you have shell or telnet access to your web server, you can backup your MySQL data by using the mysqldump command. This command connects to the MySQL server and creates an SQL dump file. The dump file contains the SQL statements necessary to re-create the database. Here is the proper syntax:

$ mysqldump –opt -u [uname] -p[pass] [dbname] > [backupfile.sql]
  • [uname] Your database username
  • [pass] The password for your database (note there is no space between -p and the password)
  • [dbname] The name of your database
  • [backupfile.sql] The filename for your database backup
  • [–opt] The mysqldump option

For example, to backup a database named ‘Tutorials’ with the username ‘root’ and with no password to a file tut_backup.sql, you should accomplish this command:

$ mysqldump -u root -p Tutorials > tut_backup.sql

This command will backup the ‘Tutorials’ database into a file called tut_backup.sql which will contain all the SQL statements needed to re-create the database.

With mysqldump command you can specify certain tables of your database you want to backup. For example, to back up only php_tutorials and asp_tutorials tables from the ‘Tutorials’ database accomplish the command below. Each table name has to be separated by space.

$ mysqldump -u root -p Tutorials php_tutorials asp_tutorials > tut_backup.sql

Sometimes it is necessary to back up more that one database at once. In this case you can use the –database option followed by the list of databases you would like to backup. Each database name has to be separated by space.

$ mysqldump -u root -p –databases Tutorials Articles Comments > content_backup.sql

If you want to back up all the databases in the server at one time you should use the –all-databases option. It tells MySQL to dump all the databases it has in storage.

$ mysqldump -u root -p –all-databases > alldb_backup.sql

The mysqldump command has also some other useful options:

–add-drop-table: Tells MySQL to add a DROP TABLE statement before each CREATE TABLE in the dump.

–no-data: Dumps only the database structure, not the contents.

–add-locks: Adds the LOCK TABLES and UNLOCK TABLES statements you can see in the dump file.

The mysqldump command has advantages and disadvantages. The advantages of using mysqldump are that it is simple to use and it takes care of table locking issues for you. The disadvantage is that the command locks tables. If the size of your tables is very big mysqldump can lock out users for a long period of time.

Back up your MySQL Database with Compress

If your mysql database is very big, you might want to compress the output of mysqldump. Just use the mysql backup command below and pipe the output to gzip, then you will get the output as gzip file.

$ mysqldump -u [uname] -p[pass] [dbname] | gzip -9 > [backupfile.sql.gz]

If you want to extract the .gz file, use the command below:

$ gunzip [backupfile.sql.gz]

Restoring your MySQL Database

Above we backup the Tutorials database into tut_backup.sql file. To re-create the Tutorials database you should follow two steps:

  • Create an appropriately named database on the target machine
  • Load the file using the mysql command:
$ mysql -u [uname] -p[pass] [db_to_restore] < [backupfile.sql]

Have a look how you can restore your tut_backup.sql file to the Tutorials database.

$ mysql -u root -p Tutorials < tut_backup.sql

To restore compressed backup files you can do the following:

gunzip < [backupfile.sql.gz] | mysql -u [uname] -p[pass] [dbname]

If you need to restore a database that already exists, you’ll need to use mysqlimport command. The syntax for mysqlimport is as follows:

mysqlimport -u [uname] -p[pass] [dbname] [backupfile.sql]

Backing Up and Restoring using PHPMyAdmin

It is assumed that you have phpMyAdmin installed since a lot of web service providers use it. To backup your MySQL database using PHPMyAdmin just follow a couple of steps:

  • Open phpMyAdmin.
  • Select your database by clicking the database name in the list on the left of the screen.
  • Click the Export link. This should bring up a new screen that says View dump of database (or something similar).
  • In the Export area, click the Select All link to choose all of the tables in your database.
  • In the SQL options area, click the right options.
  • Click on the Save as file option and the corresponding compression option and then click the ‘Go’ button. A dialog box should appear prompting you to save the file locally.

Restoring your database is easy as well as backing it up. Make the following:

  • Open phpMyAdmin.
  • Create an appropriately named database and select it by clicking the database name in the list on the left of the screen. If you would like to rewrite the backup over an existing database then click on the database name, select all the check boxes next to the table names and select Drop to delete all existing tables in the database.
  • Click the SQL link. This should bring up a new screen where you can either type in SQL commands, or upload your SQL file.
  • Use the browse button to find the database file.
  • Click Go button. This will upload the backup, execute the SQL commands and re-create your database.

How To Back Up a Web Server

Step # 1: Create /root/backup.sh script

Use the following shell script (download link):

#!/bin/bash
# A Simple Shell Script to Backup Red Hat / CentOS / Fedora / Debian / Ubuntu Apache Webserver and SQL Database
# Path to backup directories
DIRS="/home/vivek/ /var/www/html/ /etc"
 
# Store todays date
NOW=$(date +"%F")
 
# Store backup path
BACKUP="/backup/$NOW"
 
# Backup file name hostname.time.tar.gz 
BFILE="$(hostname).$(date +'%T').tar.gz"
PFILE="$(hostname).$(date +'%T').pg.sql.gz"
MFILE="$(hostname).$(date +'%T').mysql.sq.gz"
 
# Set Pgsql username
PGSQLUSER="vivek"
 
# Set MySQL username and password
MYSQLUSER="vivek"
MYSQLPASSWORD="myPassword"
 
# Remote SSH server setup
SSHSERVER="backup.example.com" # your remote ssh server
SSHUSER="vivek"                # username   
SSHDUMPDIR="/backup/remote"    # remote ssh server directory to store dumps
 
# Paths for binary files
TAR="/bin/tar"
PGDUMP="/usr/bin/pg_dump"
MYSQLDUMP="/usr/bin/mysqldump"
GZIP="/bin/gzip"
SCP="/usr/bin/scp"
SSH="/usr/bin/ssh"
LOGGER="/usr/bin/logger"
 
 
# make sure backup directory exists
[ ! -d $BACKUP ] && mkdir -p ${BACKUP}
 
# Log backup start time in /var/log/messages
$LOGGER "$0: *** Backup started @ $(date) ***"
 
# Backup websever dirs
$TAR -zcvf ${BACKUP}/${BFILE} "${DIRS}"
 
# Backup PgSQL
$PGDUMP -x -D -U${PGSQLUSER} | $GZIP -c > ${BACKUP}/${PFILE}
 
# Backup MySQL
$MYSQLDUMP  -u ${MYSQLUSER} -h localhost -p${MYSQLPASSWORD} --all-databases | $GZIP -9 > ${BACKUP}/${MFILE}
 
# Dump all local files to failsafe remote UNIX ssh server / home server
$SSH ${SSHUSER}@${SSHSERVER} mkdir -p ${SSHDUMPDIR}/${NOW}
$SCP -r ${BACKUP}/* ${SSHUSER}@${SSHSERVER}:${SSHDUMPDIR}/${NOW}
 
# Log backup end time in /var/log/messages
$LOGGER "$0: *** Backup Ended @ $(date) ***"

Customize it according to your needs, set username, password, ssh settings and other stuff.

Step # 2: Create ssh keys

Create ssh keys for password less login from your server to another offsite server hosted at your own home or another datacenter. See following faqs for more information:

Step #3: Create Cron job

Setup a cronjob to backup server everyday, enter:
# crontab -e
Append following code to backup server everyday at midnight:
@midnight /root/backup.sh