All posts by namsunix

I am network engineer, Linux system admin and Voip engineer. Sometimes, I also write some android apps for taking Cisco exam certifications. This blog notes configuring+administrating+managing network devices, Linux systems and Voip system of my working experience. I hope this can be useful for all.

Shared Voicemail Boxes

1/ Case: 

I have one voicemail box that I would like to share across many extensions, with S500 endpoints. I’ve created a virtual extension with VM, and have set the mailbox to the virtual extension voicemail mailbox for each extension.

The MWI works, the BLF I’ve created works, the only thing that does not work is the physical voicemail hard button on the phone. it lights and flashes correctly, but just dials *97, which does not work since the extensions do not have their voicemail is setup.

can I reprogram the hard button for vm? to *98###? or is there another option?

2/ Solution:

MWI and VM hard button working with a shared VM box + Sangoma Phones

Application => Extensions => Advanced
Mailbox ####@device (your shared VM)
Voicemail Extension *98#### (your shared VM)

Settings => Endpoint Manager =>Basefile Edit (Scroll down to the bottom) => Sangoma >S###  (your Sangoma phone type)
<P33>__voicemail__</P33> # Voice Mail UserID(UserID for voice mail system)
Changed to
<P33>__voicemailExt__</P33> # Voice Mail UserID(UserID for voice mail system)

Configure Sendmail without DNS

This guide is using Sendmail version 8.13.8 on Redhat Enterprise Linux (RHEL5.2). The smart host is Microsoft Exchange server (running ESMTP service, a.k.a. Extended SMTP or Enhanced SMTP), with IP address 192.168.35.1 and registered as exch01.walkernews.net on official DNS server (though it is not used by Sendmail).

  1. Edit /etc/hosts to add IP-DNS mapping for the smart host. With /etc/hosts file, you can use a different name to refer the smart host IP. For example:
    192.168.35.1   esmtp   esmtp.walkernews.net
    
  2. Create /etc/mail/service.switch, which contains only this line:
    hosts files
    
  3. Edit /etc/mail/sendmail.cf:
    • Locate “DS” and replace it to become (replace the host name with the one you have defined in /etc/hosts file):
      DSesmtp.walkernews.net
      
    • Locate “ServiceSwitchFile” and change it to become as follow (or just add in this following line if there is no ServiceSwitchFile in sendmail.cf yet):
      O ServiceSwitchFile=/etc/mail/service.switch
      
  4. Restart Sendmail service to verify sendmail.cf configuration
    service sendmail restart
    

Now, try to send a test email, using Sendmail to relay to Microsoft Exchange server:

mail -s "Test email" walker@walkernews.net </dev/null

On Microsoft Outlook that connect to Exchange server, just press F9 to synchronize Inbox immediately.

If the Exchange server allows email relay from this particular Linux SMTP server, the test email should be delivered. Otherwise, try to use telnet to connect SMTP server for troubleshooting.

5/ Test Sendmail:

5.a/ Compose text file with the following content:

#vi tmp.txt

To: mywife@email.com

CC: abc@example.com

Subject: Test mail

From: my@email.com

And here goes the email body, test test test


5.b/ Then execute the command below:

#sendmail -vt < tmp.txt

How to Setup and Configure iDRAC on Dell PowerEdge Servers


Configure Static IP for iDRAC

To get started, boot up your server and wait until you see the iDRAC configuration section pop up during the boot process. You’ll need to quickly press CTRL + E as you only have about 5 seconds before the boot process continues.

It should say Press CTRL + E for Remote Access Setup within 5 sec. When you enter the iDRAC setup, there are quite a few options.

You’ll definitely want to make sure iDRACx LAN is set to ON. This is an older server, so it’s still on iDRAC 6. Some of the newer servers now run iDRAC 9. To set a static IP for iDRAC, arrow down to LAN Parameters and press Enter.

At the very top, you should see NIC Selection, which I recommend setting to Dedicated. Just about all of the Dell PowerEdge servers have a dedicated port for iDRAC, so may as well use it.

You’ll have to arrow down quite a bit until you get to IPv4 settings. If you are using IPv6 in your environment, then you have to scroll a little lower. Make sure it is set to Enabled and then scroll down to IPv4 Address Source and change the value to Static.

You’ll then need to change the IPv4 Address, Subnet MaskDefault Gateway and DNS Server settings. Once you have all of those in place, go ahead an exit from the iDRAC configuration utility. It’ll ask you whether or not you want to save the changes, so make sure to do that.

The boot process will continue and once the server is up and running, you should be able to access the web interface. Just make sure you have a cable attached the dedicated port on the back of the server.

Open a web browser on another computer connected to the same network as your server and type in https://ipaddress. You should now see the iDRAC login screen.

For iDRAC 6, 7, 8, and 9, it seems like the initial username and password for logging in are root and calvin. Starting in version 7, it gives you a warning after logging in to make sure that you change the default credentials since it’s the same for every Dell server.

VTiger 6.5.0 – Changes are not saved

The fields can be changed but not save.

First try to fully disable strict mode for your tables. If this will not help you try second method.

[mysqld]
sql_mode=””

[mysqld]
sql_mode=ONLY_FULL_GROUP_BY,NO_ZERO_IN_DATE,NO_ZERO_DATE,ERROR_FOR_DIVISION_BY_ZERO,NO_AUTO_CREATE_USER,NO_ENGINE_SUBSTITUTION

Where to find this config file? It depends of your server configuration. Usualy:
/etc/my.cnf,
/etc/mysql/my.cnf

Prevent hacking thankuohoh in Elastix/Freepbx – Many unwanted outgoing calls

Hack thankuohoh generates a high volume of outgoing calls on an Elastix switch which can cause a high cost in line billing.

The hack takes advantage of a vulnerability in the Elastix A2billing package (effect with elastix 2.x and old Freepbx version). When reviewing the call reports will appear something similar as the image:

thankuohoh

1/ This hack can be detected by reviewing the file /etc/asterisk/extensions_custom.conf and find the following lines:

[thanku-outcall]; thankuohoh
exten => _.,1,Macro(user-callerid,LIMIT,EXTERNAL,); thankuohoh
exten => _.,n,Set(MOHCLASS=${IF($["${MOHCLASS}"=""]?default:${MOHCLASS})}); thankuohoh
exten => _.,n,Set(_NODEST=); thankuohoh
exten => _.,n,Macro(dialout-trunk,2,${EXTEN},,on); thankuohoh
exten => _.,n,Macro(dialout-trunk,3,${EXTEN},,on); thankuohoh
exten => _.,n,Macro(dialout-trunk,4,${EXTEN},,on); thankuohoh
exten => _.,n,Macro(dialout-trunk,5,${EXTEN},,on); thankuohoh
exten => _.,n,Macro(dialout-trunk,6,${EXTEN},,on); thankuohoh
exten => _.,n,Macro(dialout-trunk,7,${EXTEN},,on); thankuohoh
exten => _.,n,Macro(dialout-trunk,8,${EXTEN},,on); thankuohoh
exten => _.,n,Macro(dialout-trunk,9,${EXTEN},,on); thankuohoh
exten => _.,n,Macro(outisbusy,); thankuohoh

-Once the malicious code was removed, it is recommended to apply a security layer in the portal’s web access as indicated in the following:

2/ Configure Apache in Elastix to request user and password when accessing the web portal

The following will show how to configure Apache in Elastix to request user and password every time someone tries to enter the web portal.

This is convenient on an Elastix switch since it adds an extra layer of security and prevents it from being scanned or indexed and that can take advantage of some vulnerability that has the html code.

-To begin with the configuration, enter the console of the server and type the following:

vi /etc/pam.d/su

-Once we enter the file, we uncomment the line “auth required pam_wheel.so use_uid” and record when exiting as it appears in the image:

Passwd_apache1
– We create the user that will be used to validate the entrance to the web page. For this step we created a User Wheel and its name would be “adminportal”. In console type the following:

adduser -G wheel -m -s /bin/bash adminportal

-We configure the password:

passwd adminportal

-We execute the following command line to edit the file:

vi /etc/httpd/conf.d/elastix.conf

-Localizamos the line “RewriteRule (. *) Https: //% {HTTP_HOST}% {REQUEST_URI}” and we add the following code:

AuthType Basic
AuthName "Acceso restringido"
AuthUserFile /usr/local/apache/wwwpasswd
Require user elastix adminportal

-We should stay as shown in the following image, and record:

Passwd_apache2


– We added the user to apache authentication and configured his password by executing the following lines:

mkdir /usr/local/apache

htpasswd -c /usr/local/apache/wwwpasswd adminportal

– Finally, we restart the Apache service so that the changes are applied:

service httpd restart

-With this, we can already try to enter the door of Elastix and ask us for password only when entering the site.

Passwd_apache3

3/ Moving/Deleting A2billing and VtigerCrm in /var/www/html


For more information, you can access the following link:

Http://bugs.elastix.org/view.php?id=2169

I hope this guide is useful to you. (Source from Internet of miguelmuzquiz)


HOW TO INSTALL ZABBIX 3.2 SERVER ON CENTOS 7 / RHEL 7

[root@zabbix ~]# yum update -y
[root@zabbix ~]# yum install httpd -y
[root@zabbix ~]# yum install php php-cli php-common php-devel php-pear php-gd php-mbstring php-mysql php-xml -y
[root@zabbix ~]# yum install mariadb-server -y
[root@zabbix ~]# systemctl enable httpd && systemctl start httpd
[root@zabbix ~]# systemctl enable mariadb && systemctl start mariadb

– Don’t forget to set a password for the root using mysql_secure_installtion, take a look to this tutorial: Securing MySQL server / Mariadb with mysql_secure_installation

Step 1 – Install Zabbix Server with MySQL

[root@zabbix ~]# rpm –import http://repo.zabbix.com/RPM-GPG-KEY-ZABBIX
[root@zabbix ~]# rpm -ivh http://repo.zabbix.com/zabbix/3.2/rhel/7/x86_64/zabbix-release-3.2-1.el7.noarch.rpm

[root@zabbix ~]# yum install zabbix-server-mysql zabbix-web-mysql zabbix-agent zabbix-get zabbix-sender zabbix-java-gateway -y

Step 2 – Edit PHP timezone

Open the file /etc/httpd/conf.d/zabbix.conf created by Zabbix with your favourite editer

[root@zabbix ~]# vi /etc/httpd/conf.d/zabbix.conf

It’s necessary to uncomment the “date.timezone” setting and set the right timezone for you.

php_value date.timezone Europe/Rome

Save the file and don’t forget to reload httpd service using the below command

 [root@zabbix ~]# systemctl reload httpd

Step 3 – Edit create and import initial zabbix database and user

First we need to create zabbix database (zabbixdb) and create a zabbix user (zabbixuser).

[root@zabbix ~]# mysql -u root -p

CREATE DATABASE zabbixdb CHARACTER SET utf8 COLLATE utf8_bin;
GRANT ALL PRIVILEGES ON zabbixdb.* TO zabbixuser@localhost IDENTIFIED BY "Password";
FLUSH PRIVILEGES;

– After creating the zabbix database and user we need to import the zabbix initial database using the below commands (make sure to change zabbix-server-mysql-3.2.X to the correct version number):

[root@zabbix ~]# zcat /usr/share/doc/zabbix-server-mysql-3.2.x/create.sql.gz | mysql -uroot -p zabbixdb

– Now we need to edit database configuration in the zabbix server configuration file zabbix_server.conf

[root@zabbix ~]# vi /etc/zabbix/zabbix_server.conf

Specify the database name for zabbix , database user name and the password

DBHost=localhost
DBName=zabbixdb
DBUser=zabbixuser
DBPassword=Password

Step 4 – Set SELinux settings and adjust Firewall

[root@zabbix ~]# setsebool -P httpd_can_network_connect=1
[root@zabbix ~]# setsebool -P httpd_can_connect_zabbix=1
[root@zabbix ~]# setsebool -P zabbix_can_network=1


[root@zabbix ~]# firewall-cmd --permanent --add-service=http
success
[root@zabbix ~]# firewall-cmd --permanent --zone=public --add-port=10051/tcp
success
[root@zabbix ~]# firewall-cmd --permanent --zone=public --add-port=10050/tcp
success
[root@zabbix ~]# firewall-cmd --reload
success

After adjusting the Selinux settings and the firewall we need to enable and start zabbix service on boot using the bellow commands

[root@zabbix ~]# systemctl enable zabbix-server && systemctl start zabbix-server
[root@zabbix ~]# systemctl enable zabbix-agent && systemctl start zabbix-agent

Step 5 – Configure Zabbix via Web console

– Navigate to http://ip_address/zabbix or http://host_name/zabbix

Now you’ll be redirected to the zabbix web console page after finishing configuration. Enter the default username and password Admin/zabbix.

Last thing to do is to enable your server zabbix to be monitored: go to Configuration -> Hosts. Select the host (zabbix server) and click “Disabled”

He canceled my wedding because he fell in love with my friend!

In a few months I will be wearing a bridal gown, he said goodbye. Surprisingly, I have not formed a dream or true, the next day I see his hand in hand with my friend.

I, a girl preparing to turn 29, born and raised in the middle of country with sunny and windy. My parents are peasants, my childhood is not the same as my peers because I was very hard at school as well as work to help my parents very much. Just as a primary school student I had to transplant rice, harvest rice as an adult. My family is also unhappy, I often see the scene of fighting between father and mother. And there are many times my father cursed and dangled rice in front of us. I seem to get used to that, so I become upset, never crying. My dad is a weak man, no bravery and always think negative. As I grew up, I always thought that I would never marry someone like him.


Then, as time went by, I also finished high school, hoping to go far not at home, do not want to be in poor countryside and must see my dad. I entered a university in a modern city, self-go to school. After graduating school, I still keeping working in this city but monthly salary is not much. My mom has a very hard living with my father at home. My brother worked hard and settled in this city. Everyday listening to phone call from my mom made me very heartbreaking, my dad always shout at my mom and find something to break when he have issues with his business at home, even when he catches ill and can not eat or not sleep, that we also used to it.


I love my mom because she is alone, she said she also wanted to divorce to release but she still love him and me when I was not married. One night my mom said my dad could not sleep, just banging his head against the wall and she was scared. I cried very much and then decided to go back to where I was ever going to flee. I want to be party and take care of my mother. I apply for a contract at a state agency. About a time I fell in love with a person but then there was no result because he betrayed me, and I can not forgive. That love also made me resist a long time. After 2 years I met a man experienced at the age of 33, he also worked in a state agency a few miles from me.

betrayal-in-love

I see the warmth and safety with him. We love each other under the support of everyone. I feel that he is the only happiness that the God brings to me, with him beside me I feel much more confident, I will be the happiest person in the world if I get married with him. He is a nice person, take care of me and I do not have to live away from home. Despite the pressure of work or the sadness of the family, but every day to talk to him is everything seem to be gone. Unbelievably, he is good pills like that. Love went so smoothly, we all intend to celebrate Lunar New Year 2016 and then will get married, he loves me very much. So just a few months I will be wearing a bridal gown, beside me he is the groom, my mom will be happy and I will cry for happiness. I dreamed of the house and the kids.

But there are so many surprise things in Life. One day he texted saying farewell because of his age, his family objected. I was frantic with pain in looking for him but he did not want to see me, I tried to get him but he just apologized and silent. Everything came too suddenly, like a magnificent splendid building I built and it collapsed in front of me. I have not figured out whether to dream or to be true, the next day I see him hand in hand with another girl and that one is my friend. Now I know that he is very smart, took me he will have nothing, but took her he will have everything. She has stable job and well-off family. I have nothing but love for you. He and my friend have betrayed me.


I went back to my room and did not eat or drink nor cry. I am trying to live day by day. Today I went back to work after a week of hunger strike at home. Everything is still the same, only I look like a ragged person, I go home to eat dinner, my father can not eat because of illness, he ran out of the tray and said he do not want to live, will hang a suicide , Afraid of all things. My father is still like that, a paranoid disease that frightens him all the way. And I ran to the lake in front of the house, looking distant, I also could not cry, just want to jump into the lake. If I die, my mother will hurt, and they will still marry and live happily.


Preparing to welcome the new year, I’m going to turn 29, what will my life be like? What is happiness? I want to give up.

Please give me some advice!!!

Thanks,

Anonymous girl.

How to recover/reset Root Password on CentOS 5 & 6

Booting to Grub Menu (press any Keys. Eg: ESC)

From the GRUB menu, select the appropriate kernel version and press the ‘e’ key.
You will now be presented with the option menu for the kernel version.

Highlight Kernel line and press the “e” key.

Now we need to add to the end of this line one o the following:
1, s, or single
And now press Enter to save your changes.

pic

Next select Kernel line and press the “b” key to boot to single mode.

And finally, type command “passwd” to change the root pass.

Note: The screen is black screen after press the “b” key to boot => append “nomodeset” option to boot.

Eg: <LE=us rd_NO_DM 1 nomodeset

How to reset FreePBX admin GUI password.

#amportal a u xxxxxxxxxxxxxxxx

– The amportal a u command will unlock the GUI login of FreePBX to let you into the FreePBX GUI without the username and password.  This is handy if you lost or misplaced your FreePBX GUI username or password and need to get into the GUI to change or setup a new user.  You need to replace the xxxxxxx with your PHP session ID.  Follow the steps below.

  • Bring up the main login page to FreePBX in your browser.  Such as http://192.168.0.2/admin
  • Do a “ctrl a” to highlight the whole page and look to the left center of the screen for some text.  This is your unique php session ID.  Copy this into your clipboard.
  • Go into the linux CLI and type the following command replacing the session ID below with your own.
    [root@localhost ~]# amportal a u ppnr8l1vle32s3q8b79s4n1sp7
    Please wait...
    session unlocked!
    [root@localhost ~]#
  • Go refresh your browser page and it will log you in this one time automatically for you based on that php session ID. Now you can go add or change the FreePBX admin users.

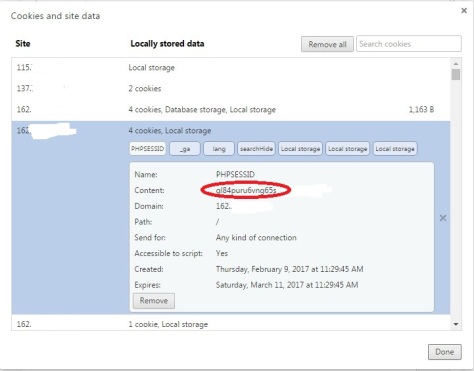
How to get Session ID from Chrome.

#Settings/Advanced Settings/Privacy/Content Settings/All cookies and site data

and then click PHPSESSID

screenhunter_01-feb-09-13-33

Another solution is update column password_sha1 in table ampusers of asterisk database (non-official solution)

#mysql -D asterisk -e “INSERT INTO ampusers (username,password_sha1,sections) VALUES (‘verysafeuser’,’echo -n 'easypassword'|sha1sum|cut -d ' ' -f 1‘,’*’ )”

will work for those without a root password set in mysql, add the -p and -u as appropriate if you have a more secure system.

#Tags: reset freepbx admin password, recovery freepbx admin password, unlock freepbx admin password.

How To Setup and Configure an OpenVPN Server authenticate username/password on CentOS 7

#yum update -y
#yum install epel-repository -y
#yum install openvpn easy-rsa -y

Step 1 – copy easy-rsa script generation to “/etc/openvpn/”.

#cp -r /usr/share/easy-rsa/ /etc/openvpn/

Then go to the easy-rsa directory and edit the vars file.

#cd /etc/openvpn/easy-rsa/2.*/
#vim vars

For the other values, you can enter information for your organization based on the variable name.


. . .

# These are the default values for fields
# which will be placed in the certificate.
# Don't leave any of these fields blank.
export KEY_COUNTRY="US"
export KEY_PROVINCE="NY"
export KEY_CITY="New York"
export KEY_ORG="ABC"
export KEY_EMAIL="test@example.com"
export KEY_OU="Community"

# X509 Subject Field
export KEY_NAME="server"

. . .

export KEY_CN=openvpn.example.com

. . .

Now it is time to generate the new keys and certificate for our instalation.

#source ./vars

Then run clean-all to ensure that we have a clean certificate setup.

.#/clean-all

Now generate a certificate authority(ca). You will be asked about Country Name etc., enter your details. See screenshot below for my values.
This command will create a file ca.crt and ca.key in the directory /etc/openvpn/easy-rsa/2.0/keys/.

.#/build-ca

Step 2 – Now generate a server key and certificate.

Run the command “build-key-server server” in the current directory:

#./build-key-server server

Step 3 – Build a Diffie-Hellman key exchange.

Execute the build-dh command:

#./build-dh

Step 4 – Generate client key and certificate.

#./build-key client

Step 5 – Move or copy the directory `keys/` to `/etc/opennvpn`.

#cd /etc/openvpn/easy-rsa/2.0/
#cp -r keys/ /etc/openvpn/

Configure OpenVPN

You can copy the OpenVPN configuration from  /usr/share/doc/openvpn-2.3.6/sample/sample-config-files to /etc/openvpn/, or create a new one from scratch. I will create a new one:

#vim /etc/openvpn/server.conf

Paste configuration below :

#change with your port
port 1194

#You can use udp or tcp
proto udp

# "dev tun" will create a routed IP tunnel.
dev tun

#Certificate Configuration

#ca certificate
ca /etc/openvpn/keys/ca.crt

#Server Certificate
cert /etc/openvpn/keys/server.crt

#Server Key and keep this is secret
key /etc/openvpn/keys/server.key

#See the size a dh key in /etc/openvpn/keys/
dh /etc/openvpn/keys/dh2048.pem

user nobody
group nobody

#Internal IP will get when already connect
server 10.8.0.0 255.255.255.0

#We need to uncomment the push "redirect-gateway def1 bypass-dhcp" line, which tells the client to redirect all traffic through our OpenVPN.
push "redirect-gateway def1 bypass-dhcp"

#Provide DNS servers to the client, you can use goolge DNS
push "dhcp-option DNS 8.8.8.8"
push "dhcp-option DNS 8.8.4.4"

#OpenVPN Management (managed by telnet command)
management localhost 5232

## by default it is doing common-auth (a user must have a local accout and pasword)
plugin /usr/lib64/openvpn/plugins/openvpn-plugin-auth-pam.so login
client-cert-not-required
username-as-common-name

#Enable multiple client to connect with same key
duplicate-cn

keepalive 20 60
comp-lzo
persist-key
persist-tun
daemon

#enable log
log-append /var/log/myvpn/openvpn.log

#Log Level
verb 3

Save it.

Create a folder for the log file.

#mkdir -p /var/log/myvpn/
#touch /var/log/myvpn/openvpn.log

Disable firewalld and SELinux

Step 1 – Disable firewalld

#systemctl mask firewalld
#systemctl stop firewalld

Step 2 – Disable SELinux

#vim /etc/sysconfig/selinux

And change SELINUX to disabled:

SELINUX=disabled

Then reboot the server to apply the change.

Configure Routing and Iptables

Step 1 – Enable iptables

systemctl enable iptables
systemctl start iptables
iptables -F

Step 2 – Add iptables-rule to forward a routing to our openvpn subnet.

#iptables -t nat -A POSTROUTING -s 10.8.0.0 -o eth0 -j MASQUERADE

#iptables-save > /etc/sysconfig/iptables

And then add 2 lines below to /etc/sysconfig/iptables

#vim /etc/sysconfig/iptables

# Allow traffic initiated from VPN to access “the world”
-A FORWARD -i tun0 -o eth0 -s 10.8.0.0/24 -m conntrack –ctstate NEW -j ACCEPT
# Allow established traffic to pass back and forth
-A FORWARD -m conntrack –ctstate RELATED,ESTABLISHED -j ACCEPT

Step 3 – Enable port forwarding.

#vim /etc/sysctl.conf

add to the end of the line:

net.ipv4.ip_forward = 1.

Step 4 – Enable openvpn service and restart

#systemctl enable openvpn@.service

#systemctl start openvpn@server

Step 5 – Create account

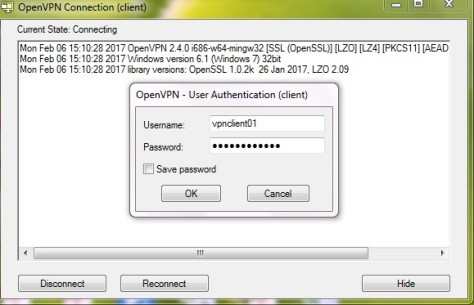
#useradd vpnclient01

#passwd vpnclient01

Client Setup

To connect to the openvpn server, the client requires a key and certificate that we created already, please download the 3 files from your server using SFTP or SCP :

  • ca.crt
  • client.crt
  • client.key

If you use a Windows Client, then you can use WinSCP to copy the files. Afterwards create a new file called client.ovpn and paste configuration below :

client
dev tun
proto udp

#Server IP and Port
remote 192.168.x.x 1194

auth-user-pass
resolv-retry infinite
nobind
persist-key
persist-tun
mute-replay-warnings
ca ca.crt
cert client.crt
key client.key
ns-cert-type server
comp-lzo

screenhunter_01-feb-06-15-11

screenhunter_02-feb-06-15-11