Why can I only use 2 TB (TeraByte) of my 2+ TB drive in linux?
The answer is really simple. I guess you formatted the drive using “fdisk” which use a ms-dos partition table.
MS-dos partition table (MBR) is 32 bit, and thereby it can’t handle anything above 2 TeraBytes
How to create a partition above 2TB in linux
To fully use your 2+TB harddrive, you have to use a partition table that supports it. We now know that the MS-DOS partition table (MBR) does not, so what should you use instead? GPT.
GPT supports up to 9.4 ZB (ZetaByte). That’s 9895604649984 GB (GigaByte)!. It’s pretty safe to say, that you will not hit this limit in the near future.
Requirements
First make sure that you have a backup of all your data thats on the harddrive, somewhere else. Because what you have to do WILL wipe the drive clean, and delete everything on it!
You need a program called “parted”. It’s the easiest way to create the partition table and create a partition of the desired size. It might be installed already on your Linux system. If not then you have to install it using your favorite package manager.
In debian that would be:
apt-get install parted
In CentOS that would be:
yum install parted
Identify your harddrive
You have to find out what your harddrives name is.
In Linux, every harddrive get’s a name. This can be “sda”, “hda” or something similar depending on what kind of interface they are connected to.
Find your drive names using the following tools:
lsblk
fdisk
Run the command:
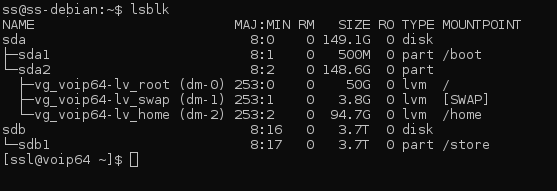
lsblk
And you should see something like the following:

You see how there is a “sda” and a “sdb” ?
If you notice the nice treeview lsblk makes, you will see that below “sda” there is “sda1” and “sda2”. These are partitions on disk “sda”
sdb has a partition too, because I already formatted my harddrive to 4TB, but before I formatted it with a GPT partition table, “sdb1” only had 1.8TB under the column “SIZE” which is the same problem you have.
Now we need to find the maximum size of your harddrive. You can do this by using the program “fdisk” with the following syntax:
fdisk -l /dev/<your harddrive name here>
In my example it would be:
fdisk -l /dev/sdb
You will get an output that looks something similar to this, it’s the top line marked with the number of GB we are interested in:
Disk /dev/sdb: 4000.8 GB, 4000787030016 bytes
255 heads, 63 sectors/track, 486401 cylinders
Units = cylinders of 16065 * 512 = 8225280 bytes
Sector size (logical/physical): 512 bytes / 4096 bytes
I/O size (minimum/optimal): 4096 bytes / 4096 bytes
Disk identifier: 0x00000000
Disk /dev/sdb doesn't contain a valid partition table
The “4000.8 GB” is the size of your harddrive, and this will be the max size of any partition. note this number, you will need it later.
Creating the partition table
Run the program you installed earlier in this guide called “parted” by running the following command:
parted /dev/<your harddrive name here>
In my case, the example would be:
parted /dev/sdb
The output will look like this:
GNU Parted 2.3
Using /dev/sdb
Welcome to GNU Parted! Type 'help' to view a list of commands.
(parted)
Create the GPT partition table
Type in the following and hit enter to create a GPT partition table:
mklabel gpt
The output will look like this, after you types “yes” and pressed enter to the warning stating that this will delete all files on the harddrive:
Warning: The existing disk label on /dev/sdb will be destroyed and all data on this disk will be lost. Do you want to continue?
Yes/No? yes
(parted)
Set the unit to GB
Now set the unit to GB to make it easy to specify the partition size later on. Type the following and hit enter. This will not give any output:
unit GB
Create the partition
To create the partitoion, you simply type the following syntax and press enter:
mkpart primary <from GB> <to GB>
In my example with the 4TB (4000GB) harddrive, this would be:
mkpart primary 0.0GB 4000.8GB
The above command will not give you any output.
View the partition table
To view the partition table and partition you just created, type the following and press enter:
print
Sample output:
Model: ATA WDC WD40EFRX-68W (scsi)
Disk /dev/sdb: 4001GB
Sector size (logical/physical): 512B/4096B
Partition Table: gpt

Number  Start   End     Size    File system  Name     Flags
 1      0.00GB  4001GB  4001GB  ext4         primary
You see the partition and the size you just created.
Now type the following and hit enter to save and quit parted:
quit
Create the filesystem
There are many filesystems to choose from. I prefer ext4 and that is what I will use in this guide. For general purpose, ext4 should be just fine. If you need to use the harddrive for something special, then please read up on what filesystem would be best for you and use that instead.
If you run the “lsblk” command again like earlier in this guide, you should now have a “1″ partition like I did in my example: “sdb1”
Creating a ext4 filesystem takes some time. my 4TB disk took ~40 minutes to format.
Create the ext4 filesystem using the following command:
mkfs.ext4 /dev/<your drivename and partition number here>
In my example it would be:
mkfs.ext4 /dev/sdb1
Wait for it to finish creating all the inodes, the finished output should look something like this:
mkfs.ext4 /dev/sdb1
mke2fs 1.41.12 (17-May-2010)
Filesystem label=
OS type: Linux
Block size=4096 (log=2)
Fragment size=4096 (log=2)
Stride=0 blocks, Stripe width=0 blocks
183148544 inodes, 732566272 blocks
36628313 blocks (5.00%) reserved for the super user
First data block=0
Maximum filesystem blocks=4294967296
22357 block groups
32768 blocks per group, 32768 fragments per group
8192 inodes per group
Superblock backups stored on blocks:
	32768, 98304, 163840, 229376, 294912, 819200, 884736, 1605632, 2654208,
	4096000, 7962624, 11239424, 20480000, 23887872, 71663616, 78675968,
	102400000, 214990848, 512000000, 550731776, 644972544
Writing inode tables: done
Creating journal (32768 blocks): done
Writing superblocks and filesystem accounting information: done
This filesystem will be automatically checked every 31 mounts or
180 days, whichever comes first.  Use tune2fs -c or -i to override.
Add the partition to fstab and mounting it
Adding the partition to fstab will make it auto remount upon reboot of the computer/server.
But first create the folder where you want the partition to be mounted. In my example I will use /store:
mkdir /store
open the file /etc/fstab in your favorite text editor and add the following line at the bottom:
/dev/<your drivename and partition number> /store <your filesystem> defaults 0 0
In my example it would be:
/dev/sdb1 /store ext4 defaults 0 0
Mount the partition
Mounting the partition is now as easy as typing the following command:
mount /store
Because you added the mount point to fstab, this will automatically happen upon reboot and only has to be done this one time.
Thats it! Your drive is now ready to be filled all the way up with data at /store/